Configure SSO with Microsoft Entra ID
This page explains how to connect your organization’s Microsoft Entra ID directory to Clovis. The integration uses the OpenID Connect (OIDC) protocol: users authenticate with Microsoft and then access Clovis with their business identity.
Configuration takes place in two stages:
- your administrator creates an app registration in Microsoft Entra ID;
- the Clovis team configures the identity provider using the settings provided by your organization.
Prerequisites
Before you begin, make sure you have:
- an account authorized to create app registrations in your Microsoft Entra ID tenant;
- the redirect URI for your organization, provided by the Clovis team;
- a secure channel agreed with the Clovis team for sending the client secret.
The redirect URI usually has the following format:
https://iam.clovis-ai.fr/realms/clovis-prod/broker/<SSO_IDENTIFIER>/endpoint
The redirect URI must exactly match the value configured in Clovis. Do not derive the SSO identifier from your organization’s name.
1. Create the app registration
- Sign in to the Microsoft Entra admin center.
- Open Entra ID, then App registrations.
- Select New registration.
- Enter a descriptive name, such as
Clovis SSO. - Under Supported account types, select Accounts in this organizational directory only (Single tenant).
- Under Redirect URI, select the Web platform, then paste the URI provided by the Clovis team.
- Select Register.
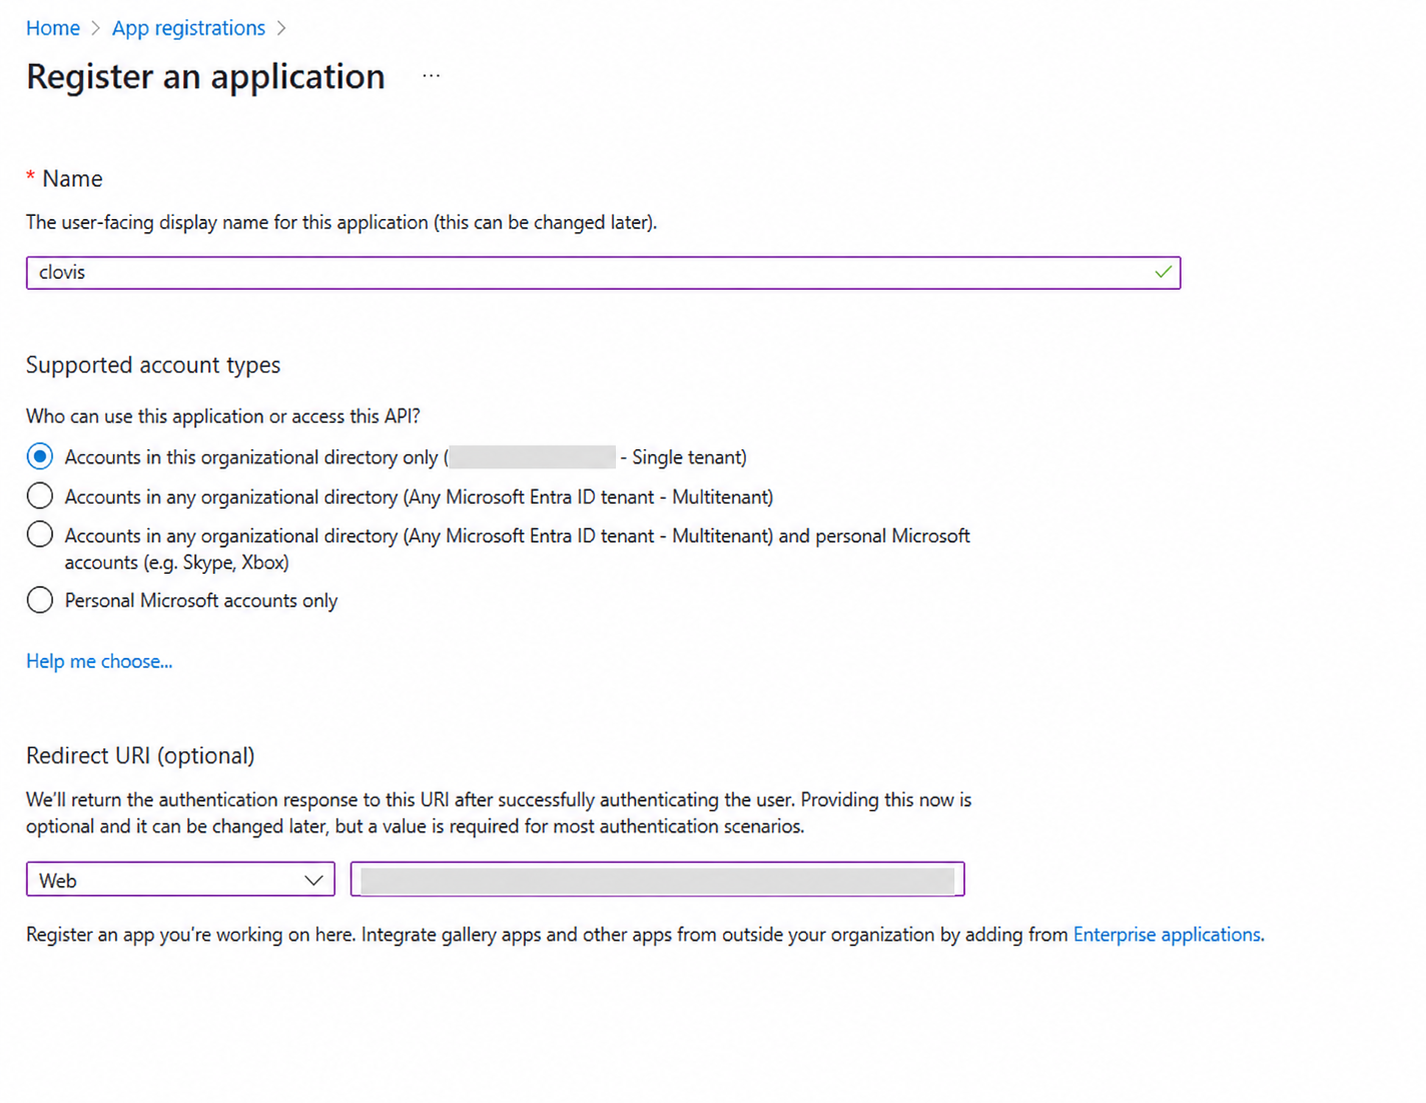
The grayed-out areas hide values specific to the organization.
You can also add the URI after creating the application by going to Authentication > Add a redirect URI > Web.
2. Record the identifiers
On the app registration’s Overview page, record the following two values:
| Microsoft Entra field | Value to provide |
|---|---|
| Application (client) ID | OIDC client identifier |
| Directory (tenant) ID | Microsoft Entra ID tenant identifier |
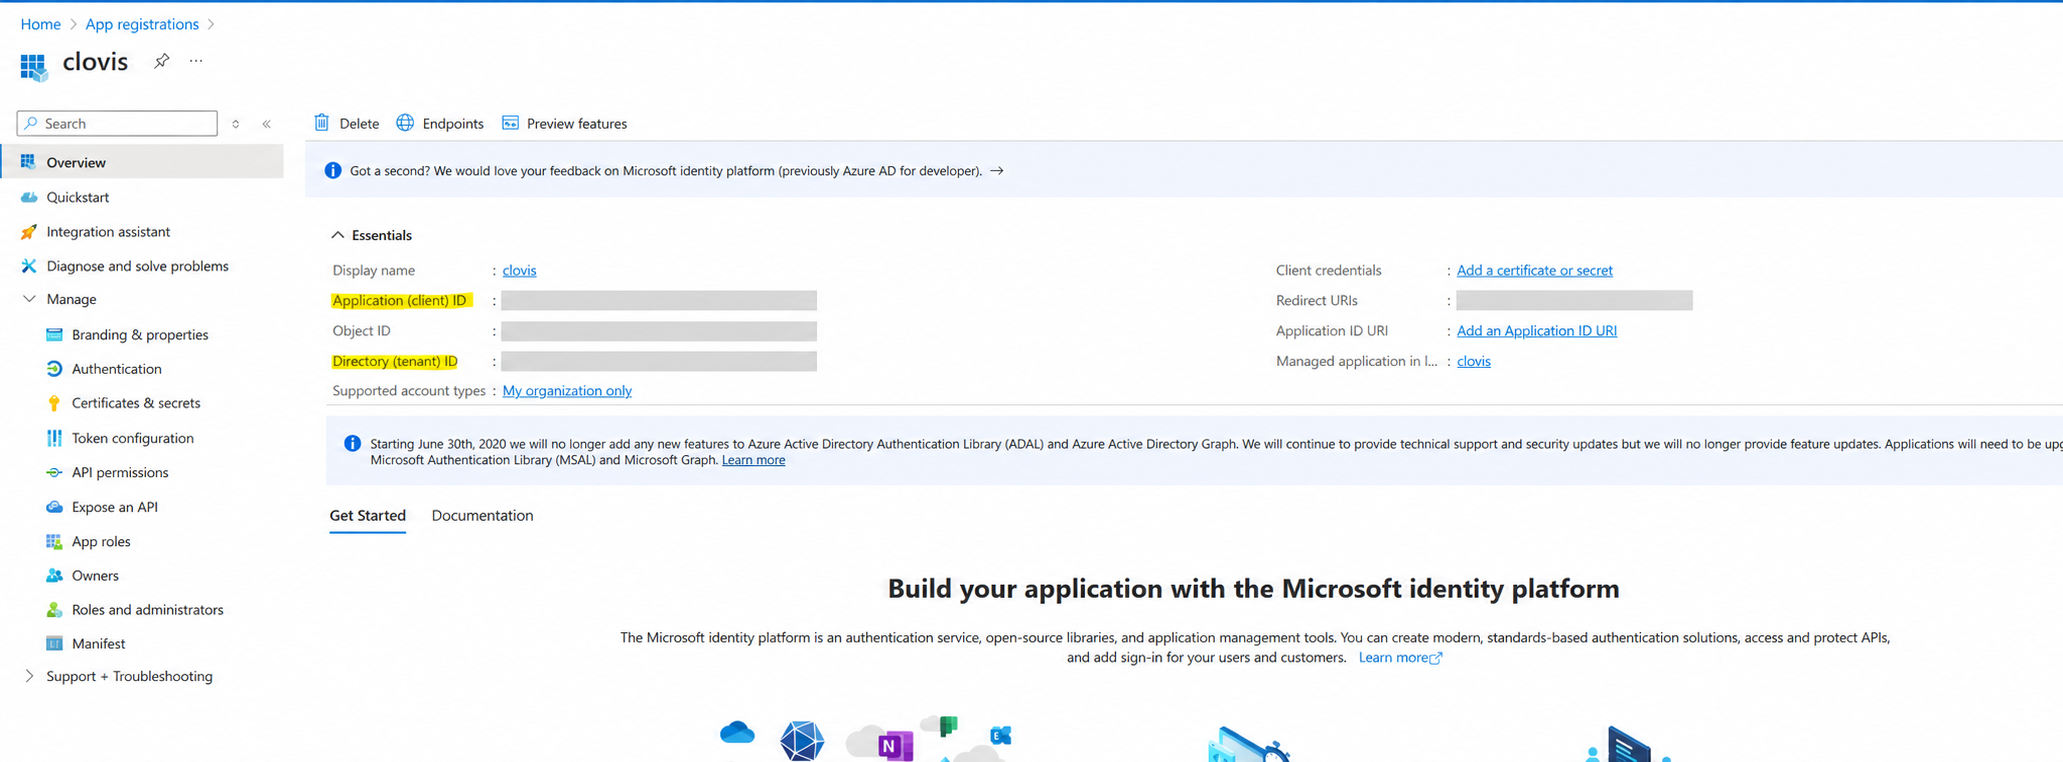
These identifiers are not secrets, but they should be shared only for the purposes of the integration.
3. Create a client secret
- In the app registration, open Certificates & secrets.
- Under Client secrets, select New client secret.
- Enter a description, such as
Clovis SSO. - Choose an expiration date that complies with your organization’s security policy.
- Select Add.
- Immediately copy the secret’s Value.
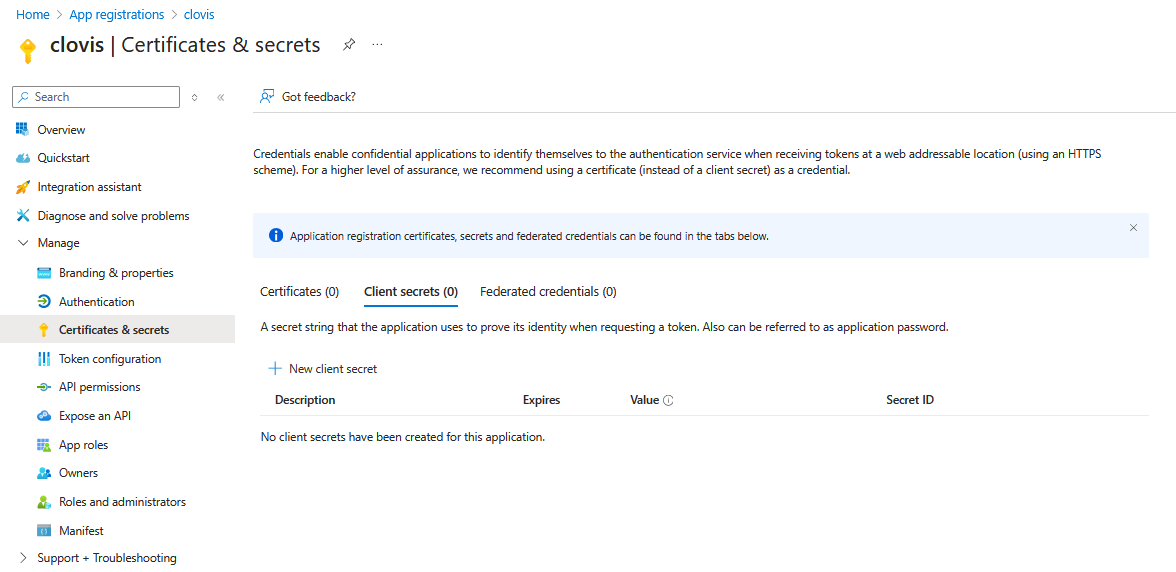
Microsoft Entra ID displays the secret value only once. Do not provide the secret ID instead, and never send the secret in an email, an unsecured ticket, or a shared document.
Record its expiration date so you can arrange its rotation before it becomes invalid.
4. Configure OIDC permissions
- Open API permissions.
- Select Add a permission.
- Choose Microsoft Graph, then Delegated permissions.
- Add the following OpenID permissions:
openid: allows the user to be authenticated;profile: provides access to the profile information needed to identify the user.
- Depending on your tenant’s policies, select Grant admin consent.
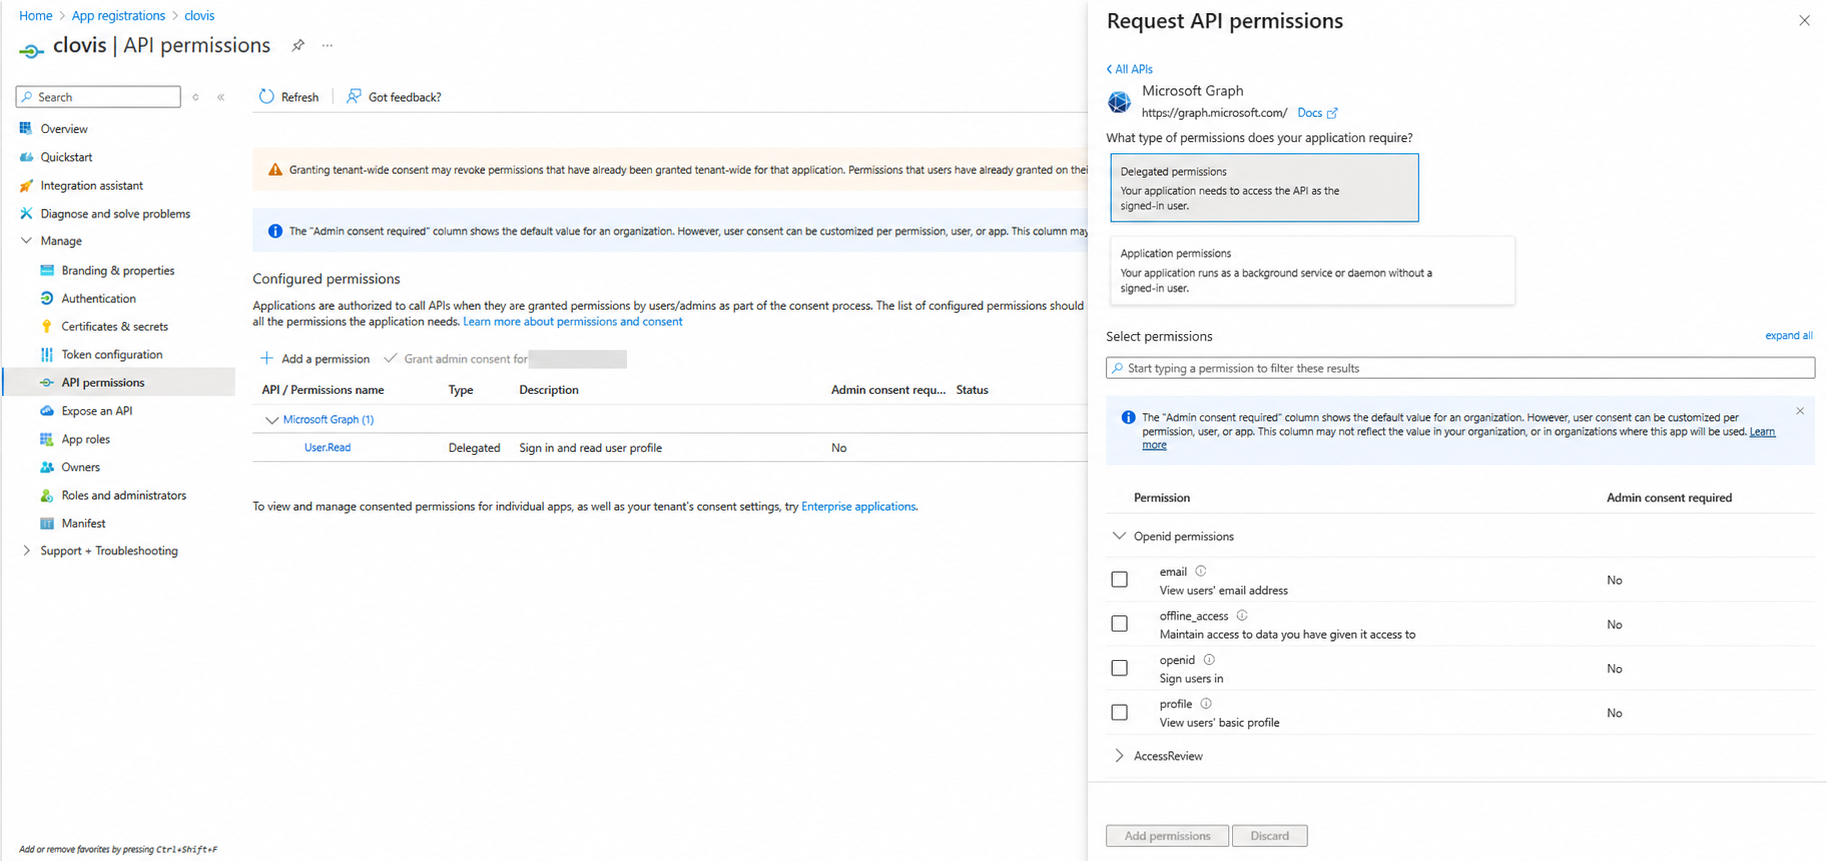
A recent app registration may already contain the User.Read permission. Do not change existing permissions without approval from your Entra ID administrator. Do not add any other permissions unless the Clovis team asks you to.
5. Send the configuration to Clovis
Send the following items through the secure channel agreed with the Clovis team:
- the Application (client) ID;
- the Directory (tenant) ID;
- the client secret value;
- the secret expiration date.
The Clovis team then completes the identity provider configuration and confirms when the integration is ready for testing.
6. Test the connection
After receiving confirmation from the Clovis team:
- open the Clovis sign-in page in a private browsing window;
- choose your organization’s SSO sign-in option;
- sign in with an authorized test account;
- check that the user is redirected to Clovis and has the expected access.
Test at least one authorized user. If your organization applies Conditional Access policies or requires users to be explicitly assigned to the enterprise application, also check these settings in Microsoft Entra ID.
Troubleshooting
| Symptom | What to check |
|---|---|
Microsoft displays an AADSTS50011 error | The redirect URI registered in Entra ID must exactly match the one provided by Clovis. |
| Consent is denied | A tenant administrator may need to grant consent on behalf of the organization. |
| The secret is rejected | Make sure you provided the secret value, that it has not expired, and that no characters were omitted. |
| The user cannot open the application | Check Conditional Access policies and, if enabled, user assignment in the enterprise application. |
Renew the secret
Before the current secret expires:
- create a new client secret in the same app registration;
- send its value and expiration date to the Clovis team through the secure channel;
- wait for confirmation that it has been applied, then test the connection;
- delete the old secret when it is no longer in use.
Keep at least one clearly identified owner on the app registration and schedule an alert before each expiration date.