Create an App Registration with Sites.Selected for SharePoint
This guide explains how to:
- Create an App Registration in Microsoft Entra ID (formerly Azure AD).
- Grant it the Microsoft Graph application permission
Sites.Selected. - Give the application
read,write,manage, orfullcontrolaccess to one specific SharePoint site. This guide usesreadby default. - Retrieve the required Tenant ID, Client ID, client secret, and Site ID.
1. Concepts and prerequisites
Why use Sites.Selected?
Broad permissions such as Sites.Read.All, Sites.ReadWrite.All, and Sites.FullControl.All grant access to every SharePoint site in the tenant. This is rarely desirable.
Sites.Selected grants no access by default. The application can only access sites that have been explicitly assigned to it, with the selected permission level. This follows the recommended principle of least privilege.
Prerequisites
| Item | Details |
|---|---|
| Role required to create the app | Application Administrator, Cloud Application Administrator, or Global Administrator |
| Role required to grant admin consent | Privileged Role Administrator or Global Administrator |
| Identity used to assign a site | An application or SharePoint administrator account with Sites.FullControl.All |
| Tools | A browser and Python 3 |
The account used in this guide has the Global Administrator role.
2. Create the App Registration
Use the Entra portal
- Open the Azure portal or the Microsoft Entra admin center.
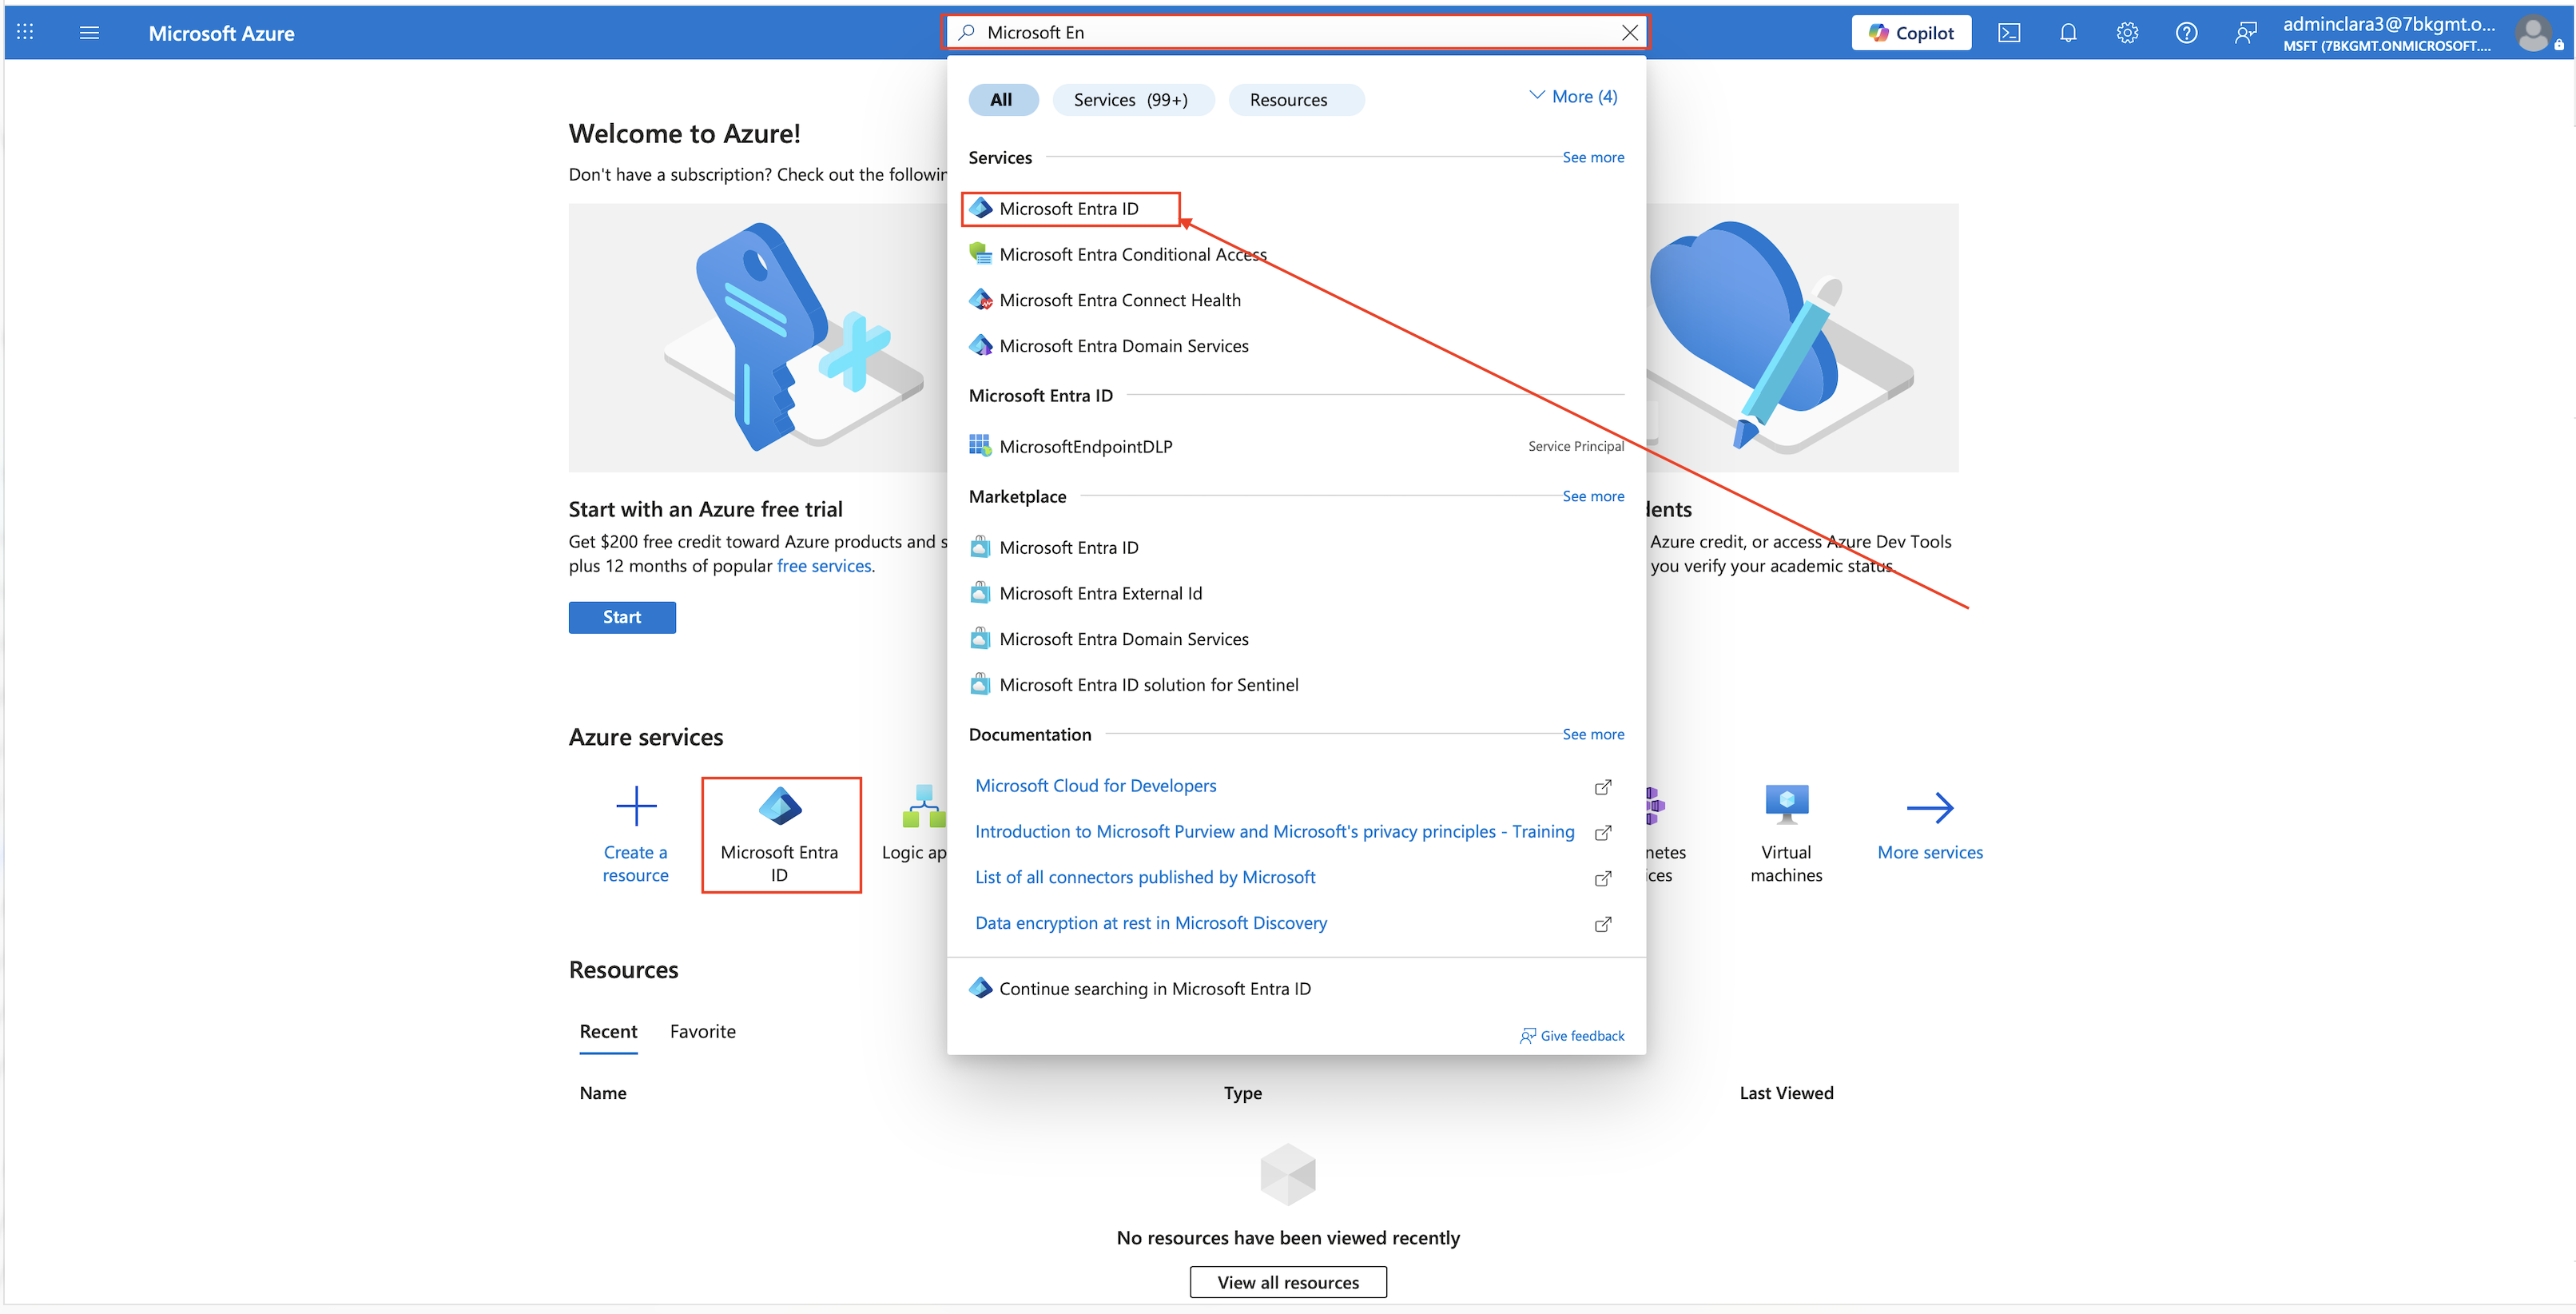
- Search for Microsoft Entra ID, then open the service.
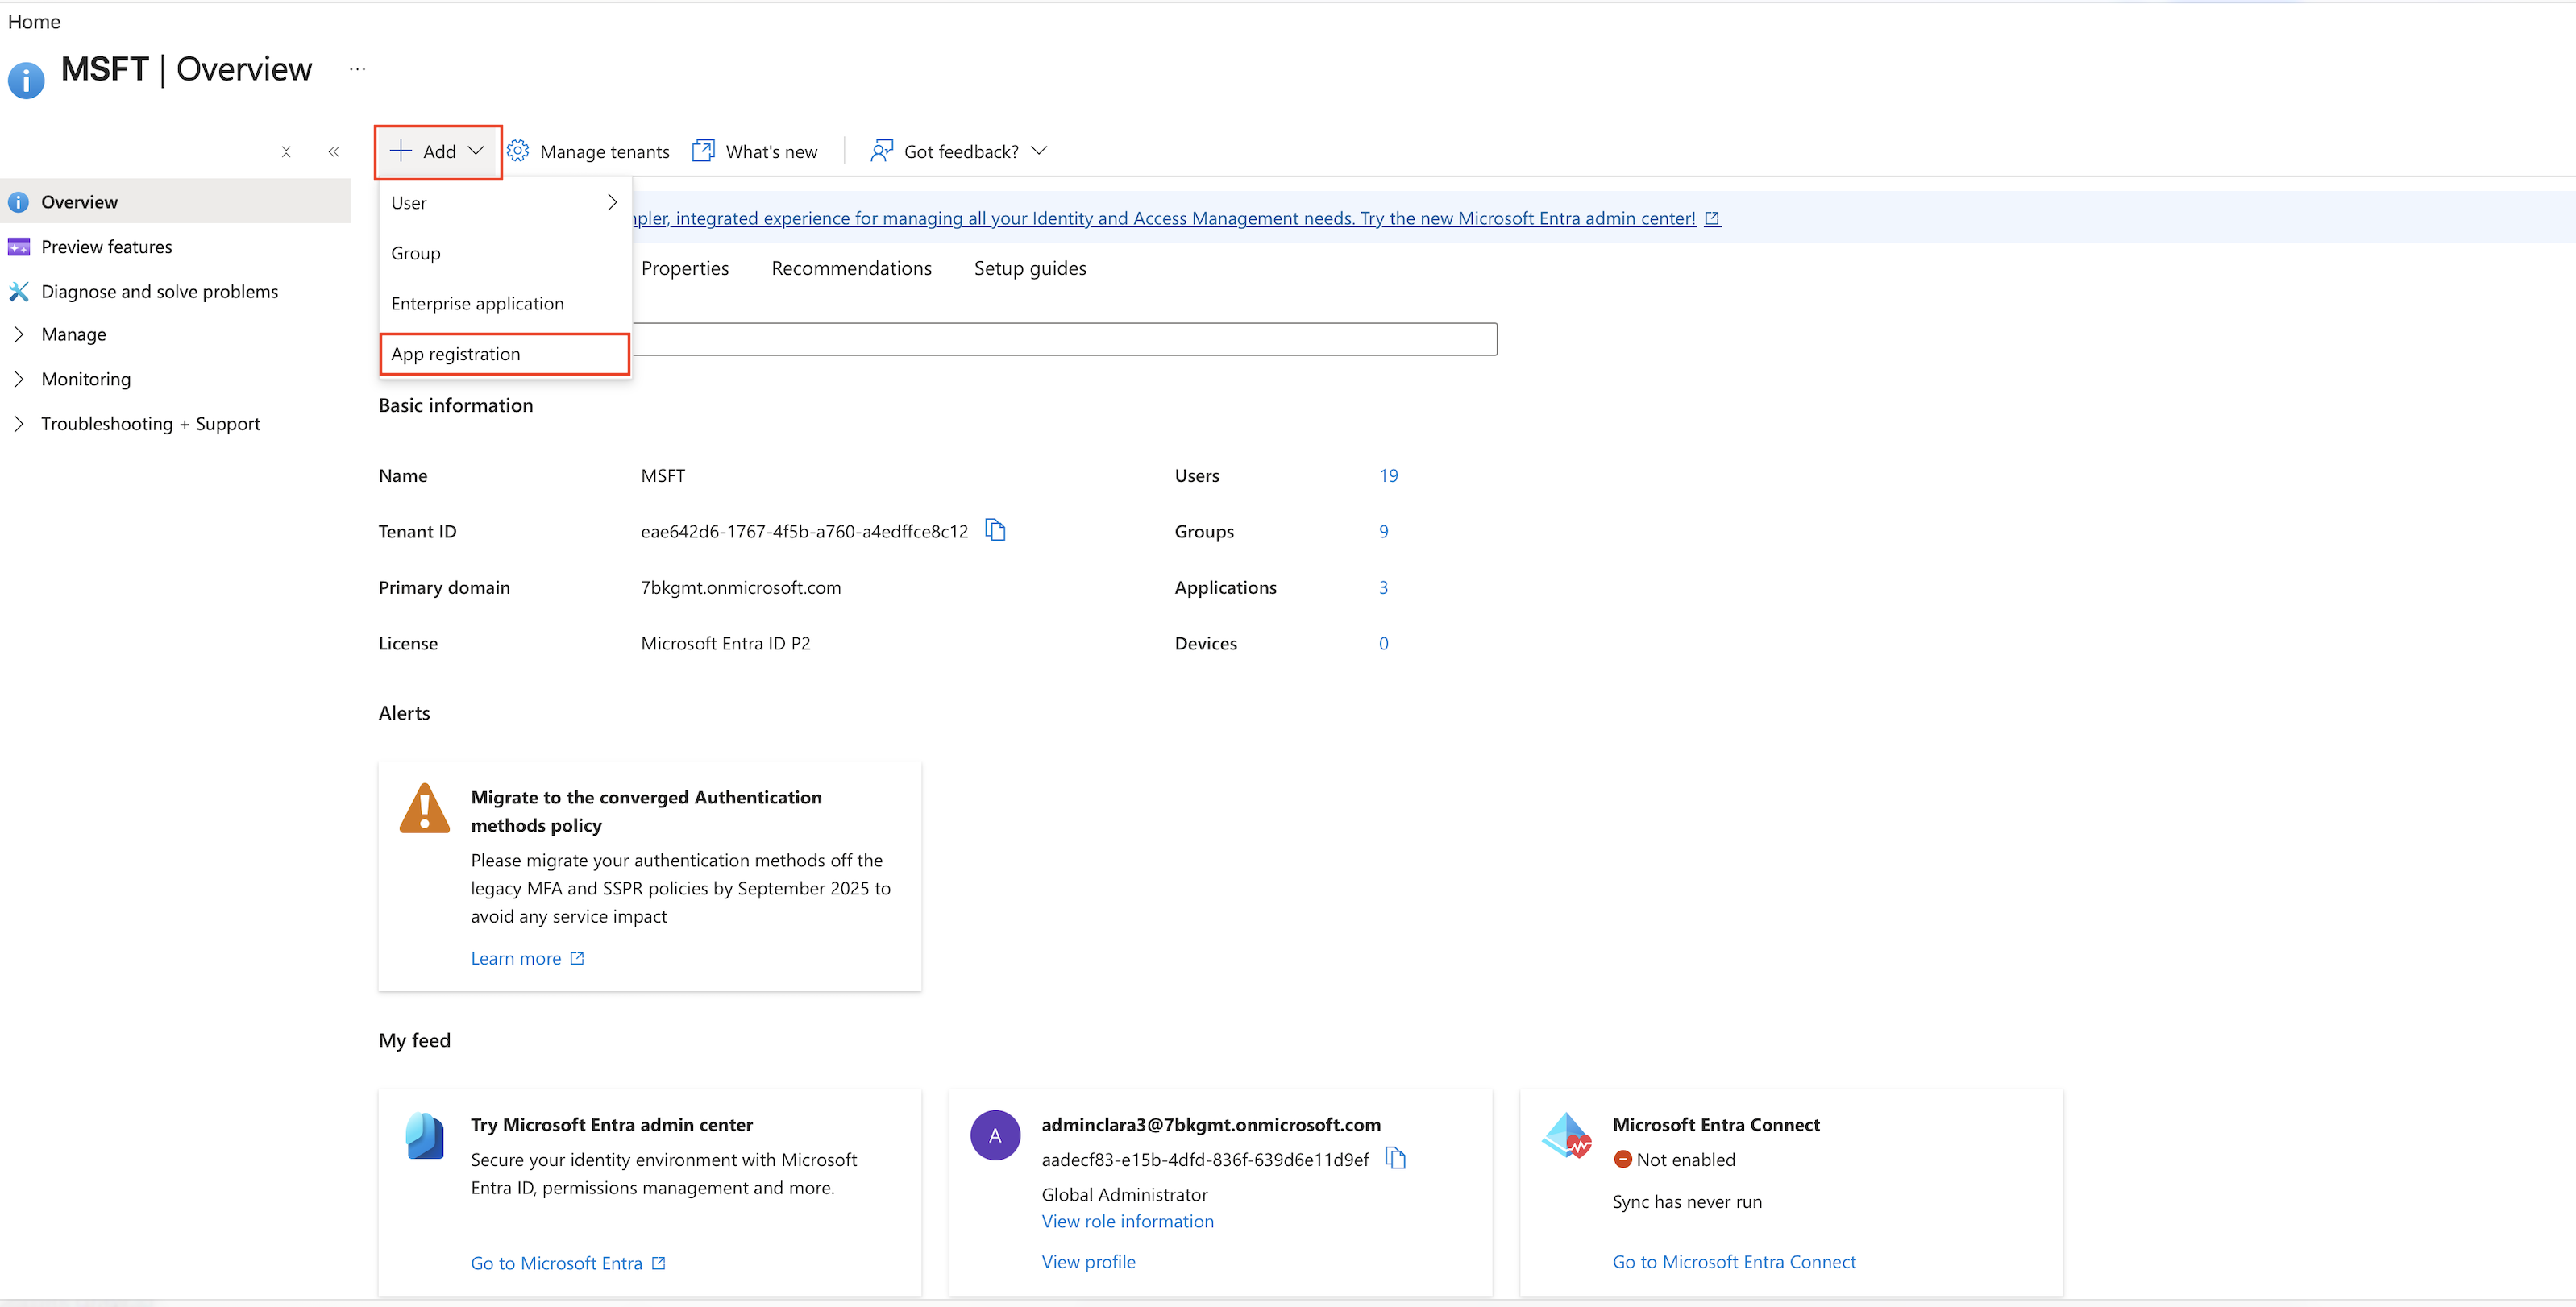
- Select Add > App registration.
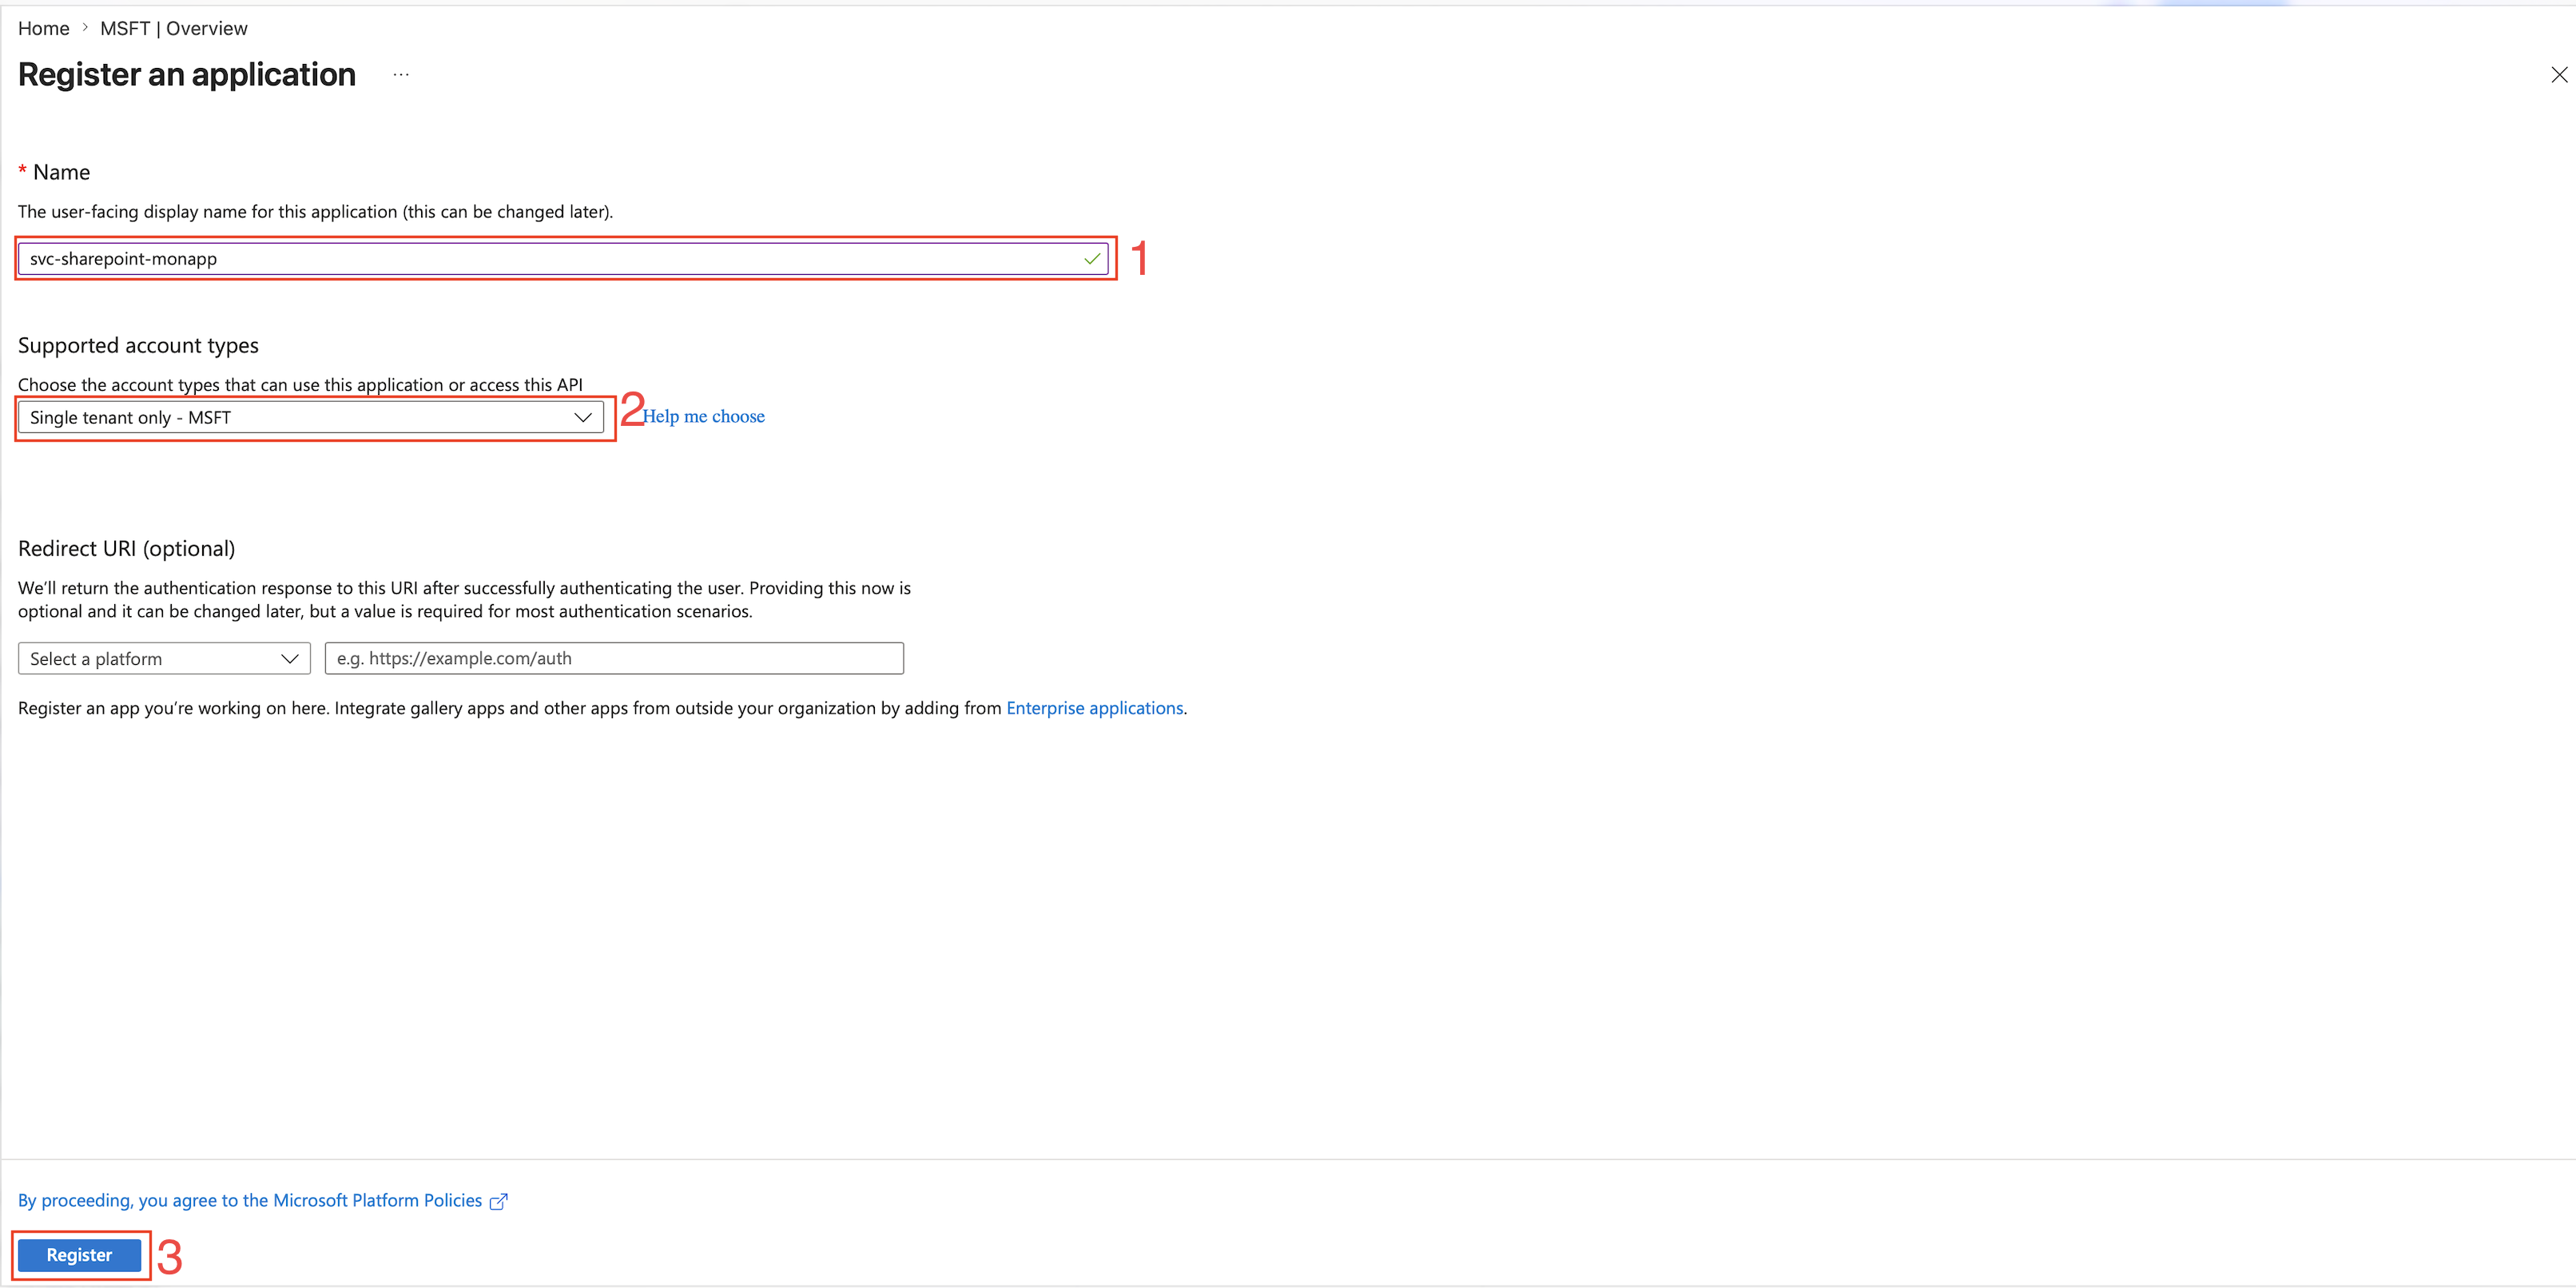
- Complete the following fields:
- Name: for example,
svc-sharepoint-myapp. - Supported account types: select Single tenant only, unless you specifically need a multi-tenant application.
- Redirect URI: leave this empty because it is not required for the client credentials flow.
- Name: for example,
- Select Register.
Retrieve the application identifiers
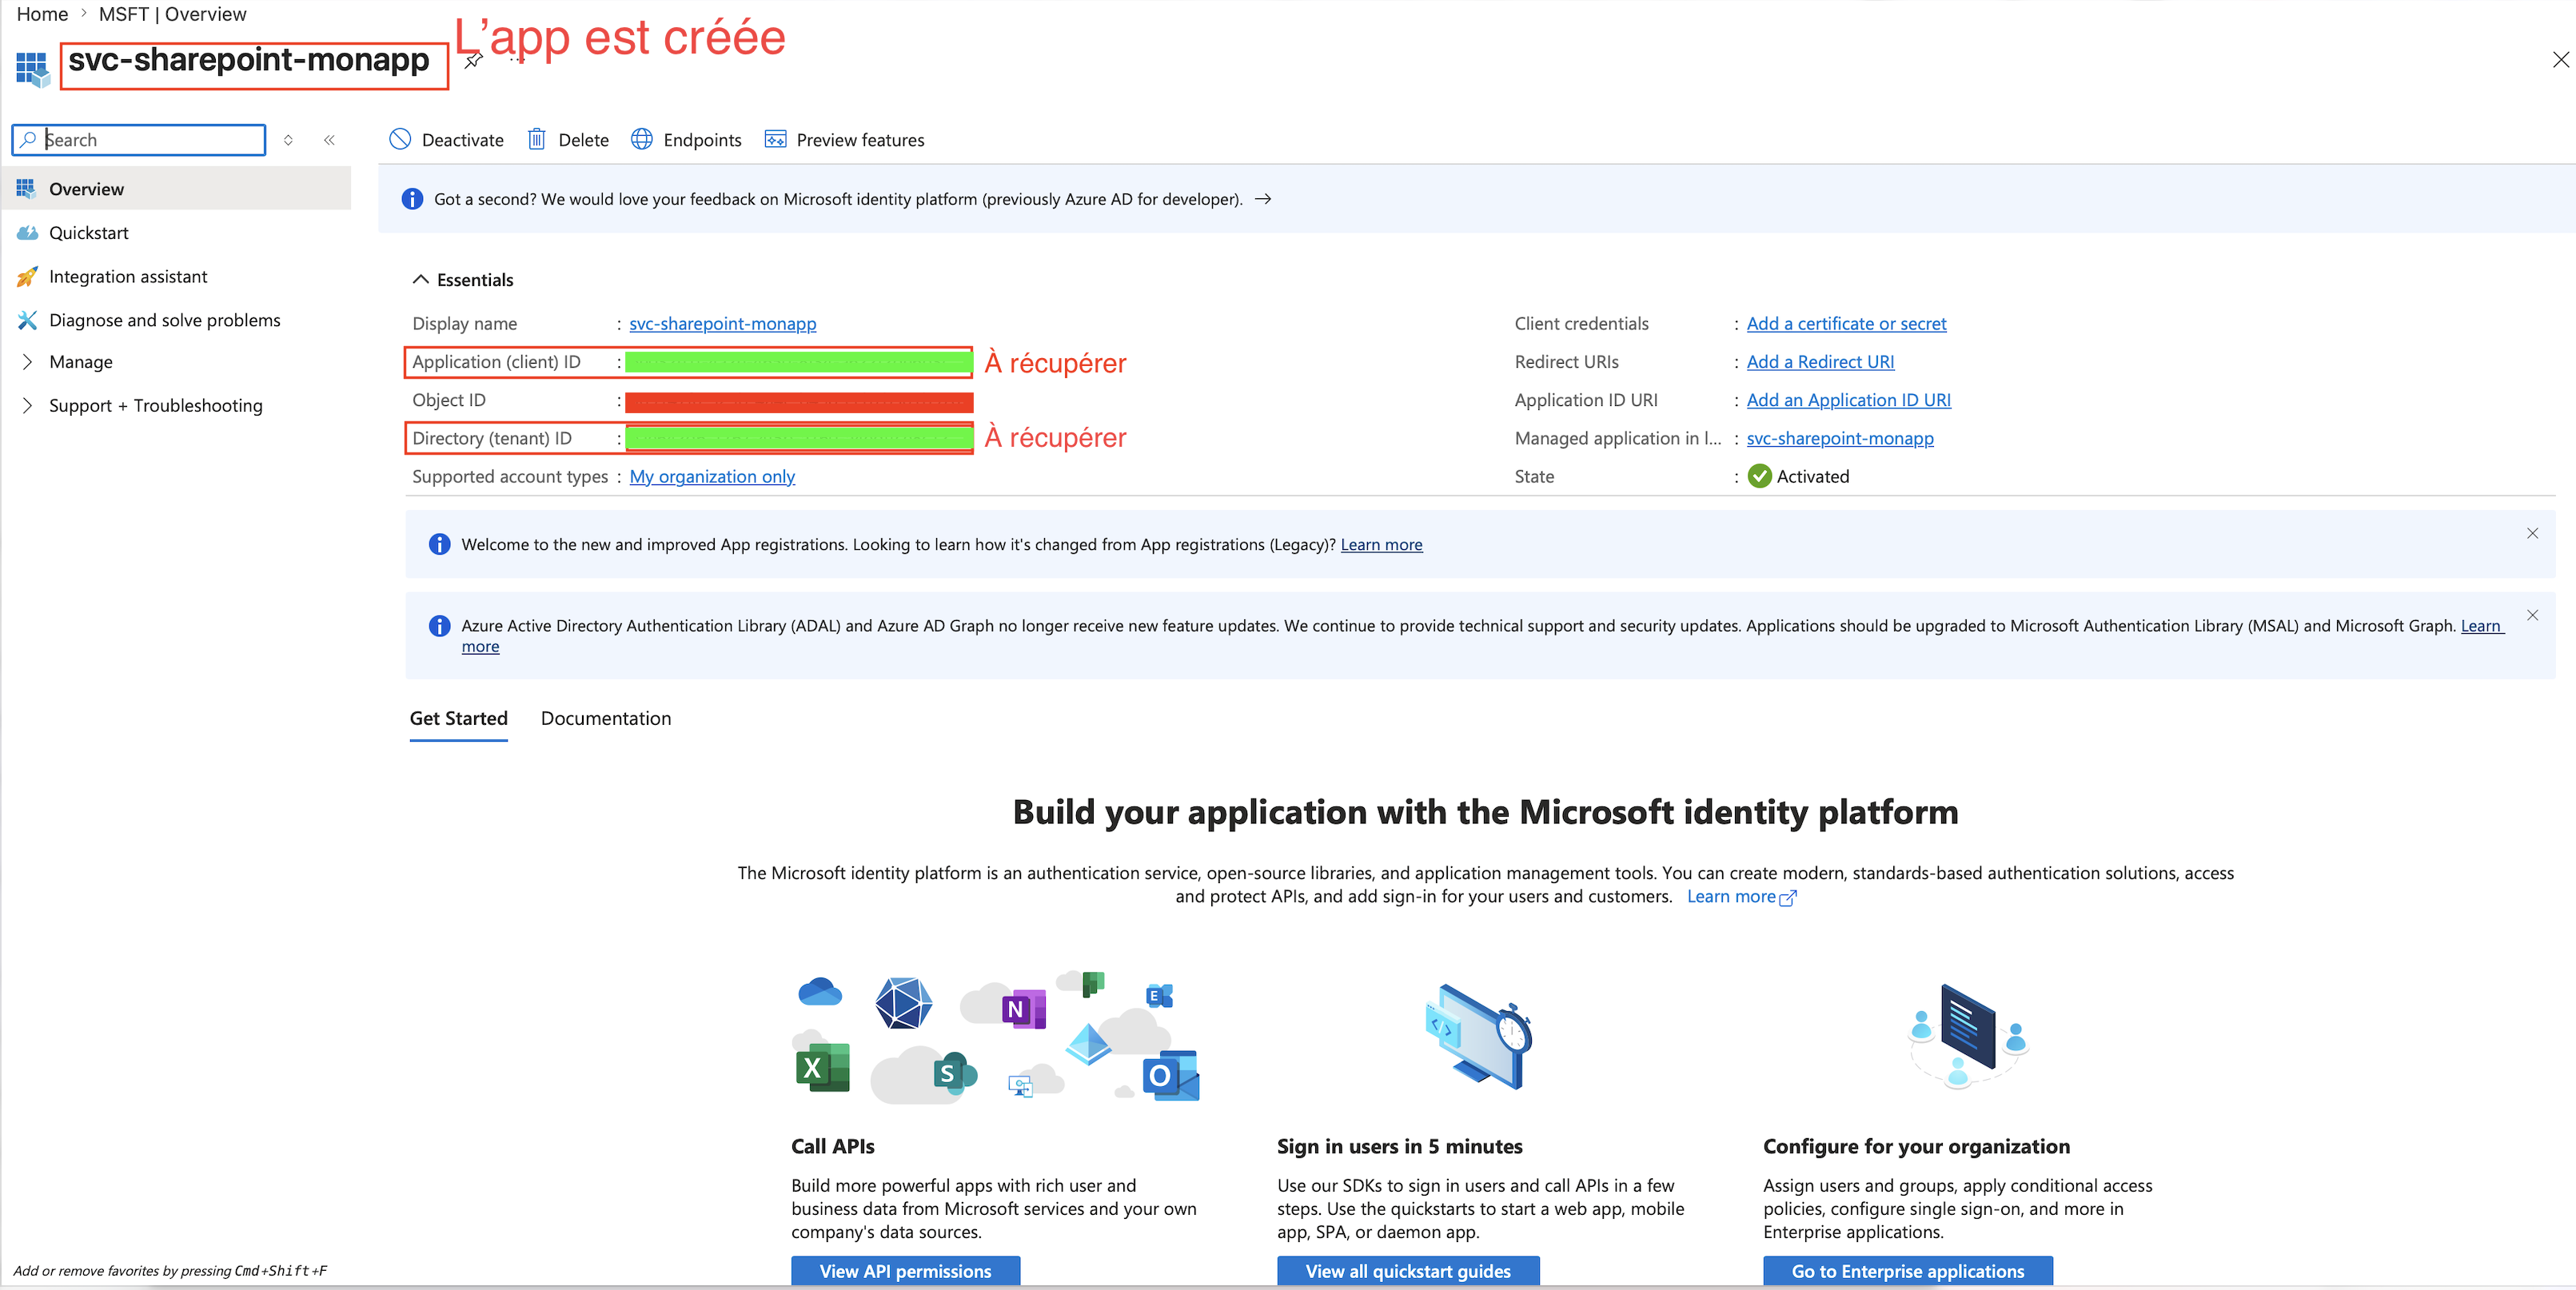
On the application Overview page, copy the Application (client) ID and Directory (tenant) ID.
| Identifier | Location | Purpose |
|---|---|---|
| Application (client) ID | Overview | Application authentication |
| Directory (tenant) ID | Overview | Tenant authentication |
3. Add the Sites.Selected permission
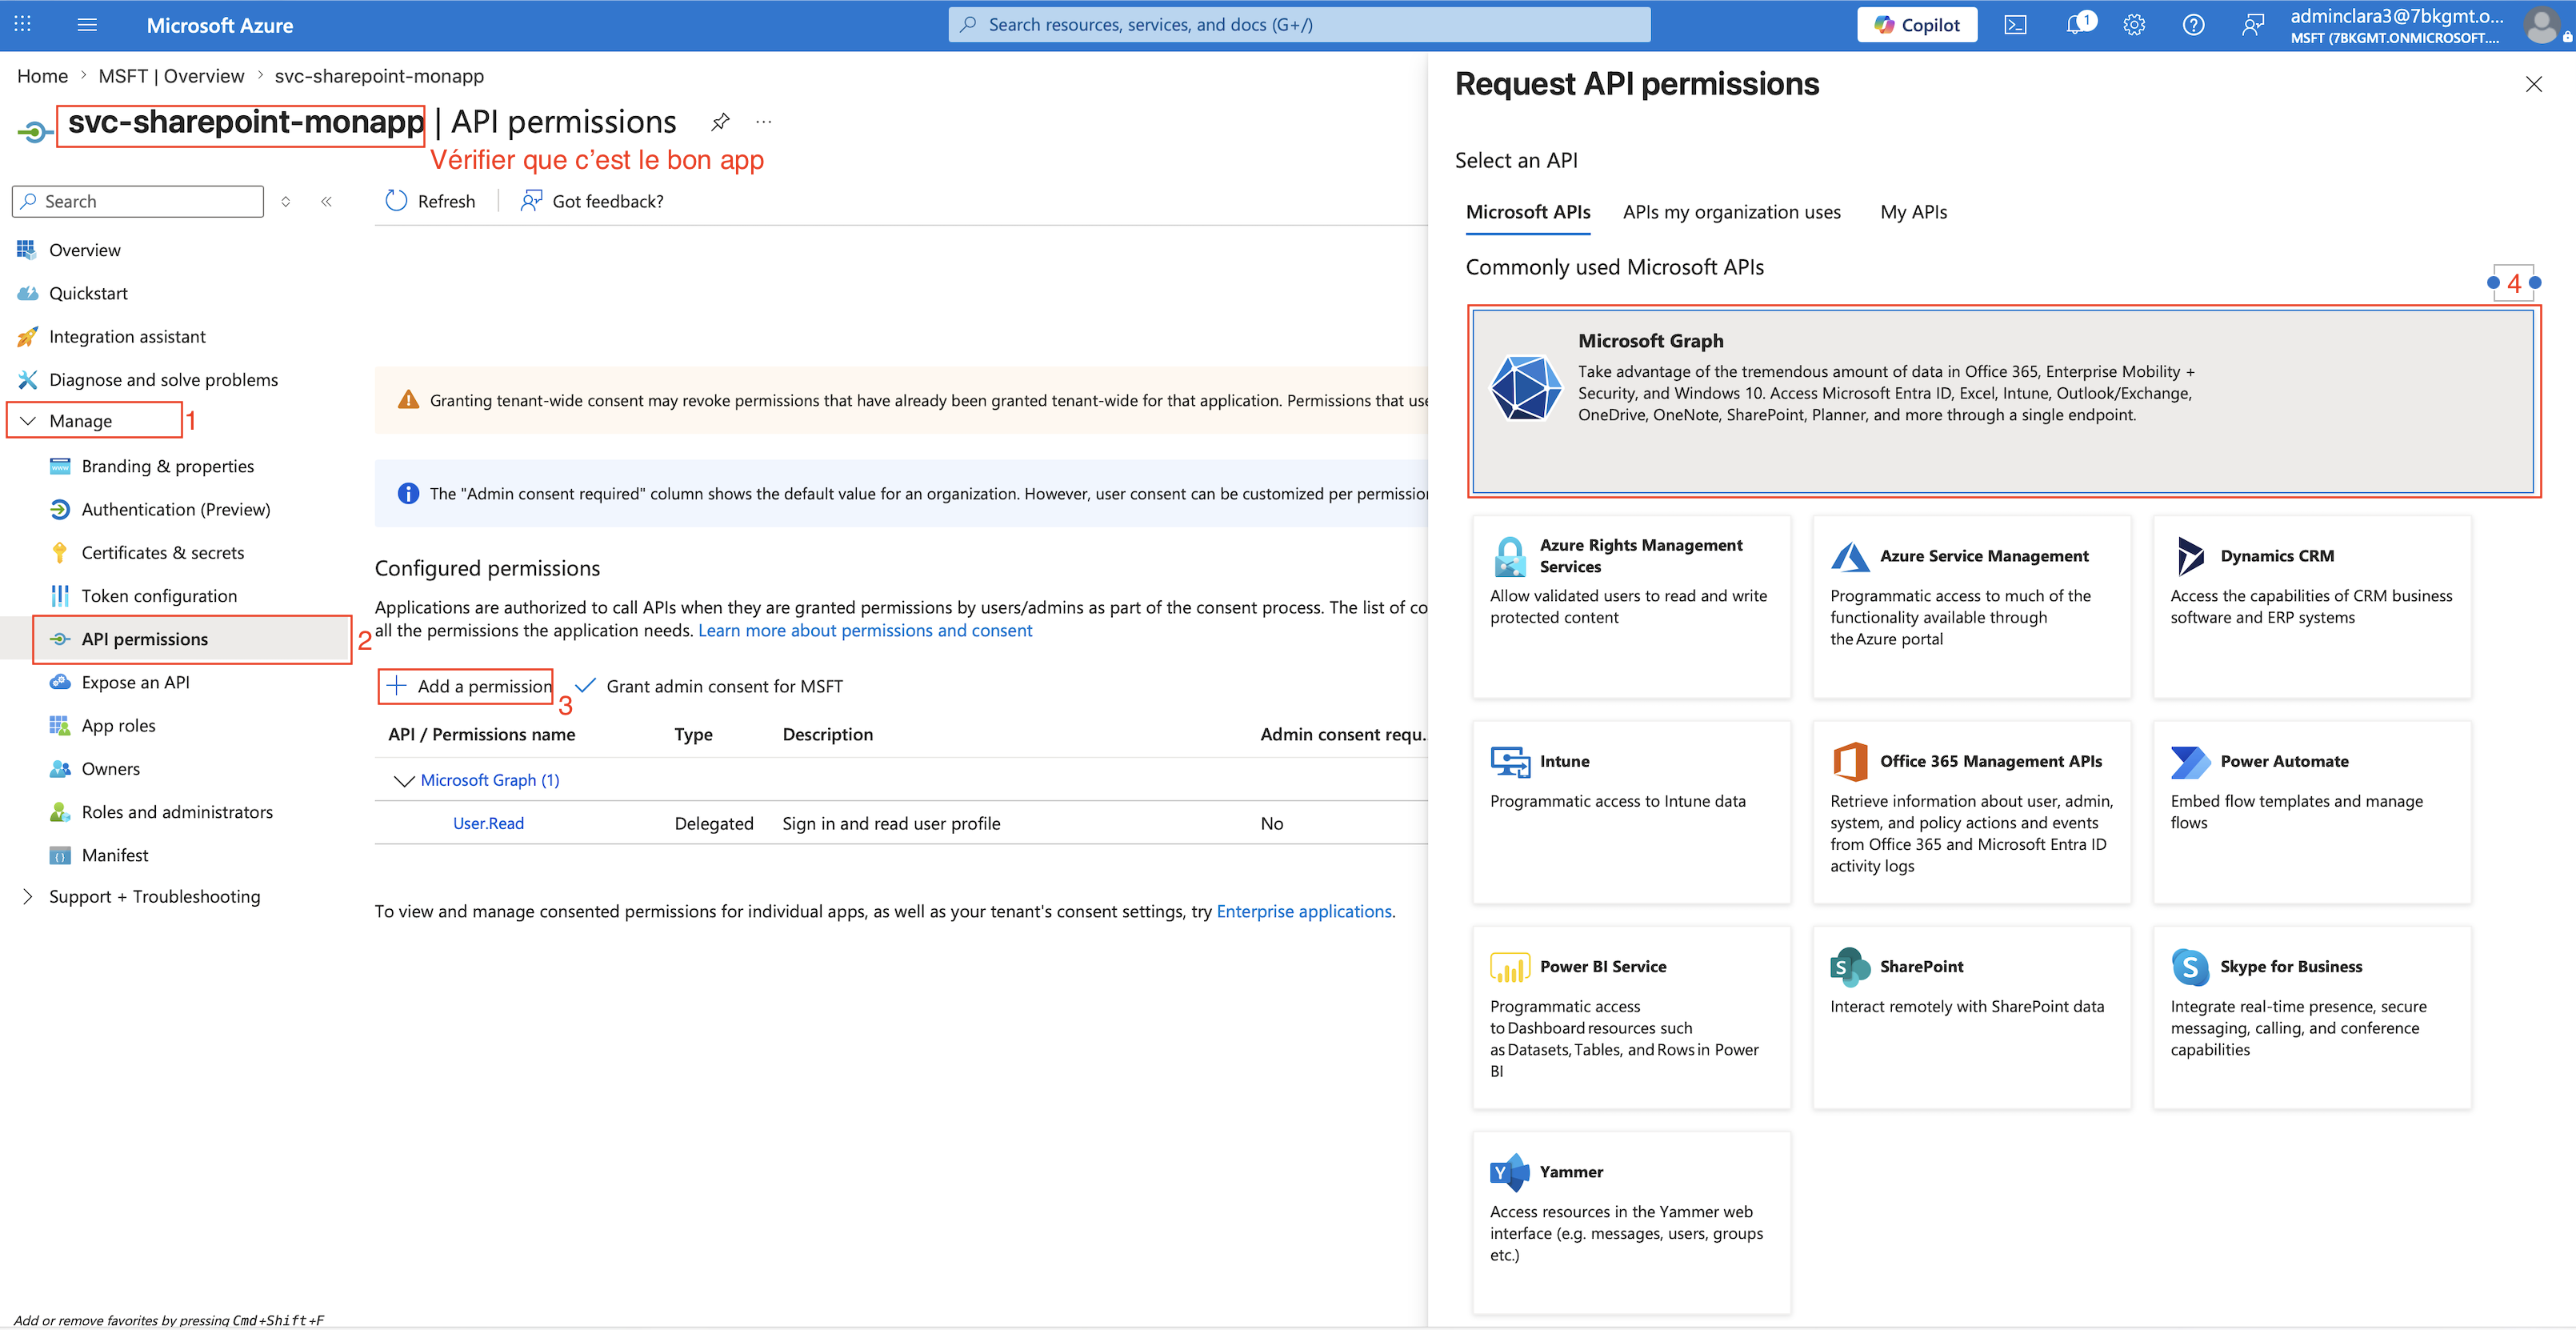
- In the application, open API permissions > Add a permission.
- Select Microsoft Graph.
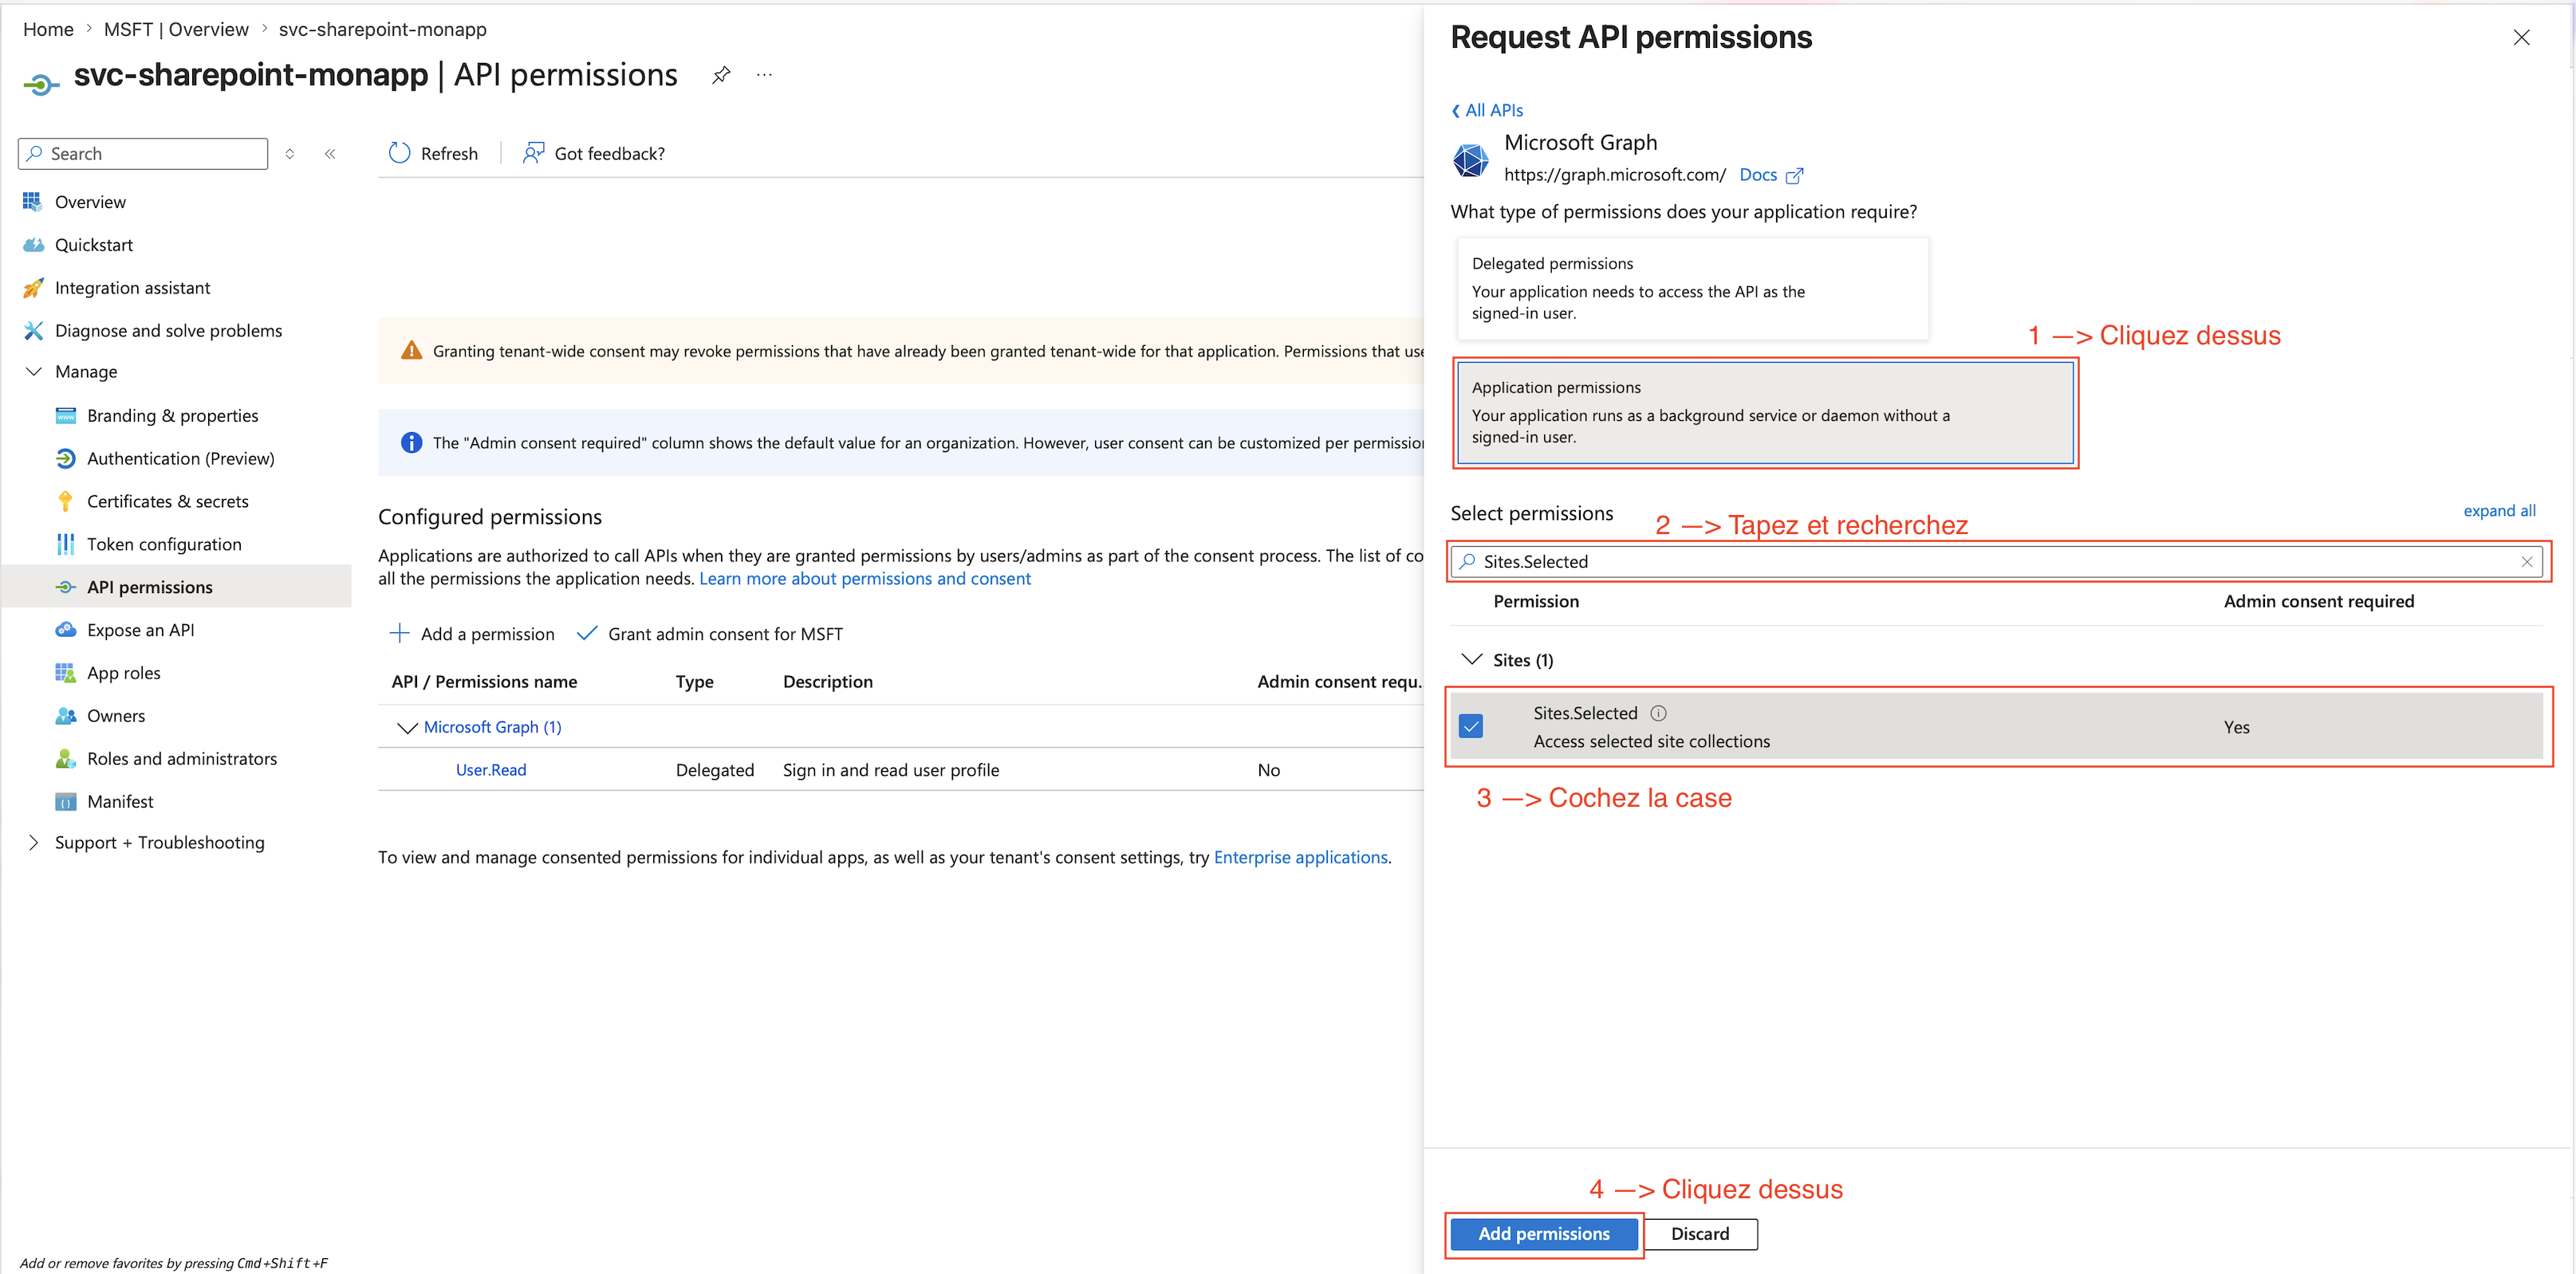
- Select Application permissions, not Delegated permissions, because this is machine-to-machine access.
- Search for
Sites.Selected, select it, then choose Add permissions.
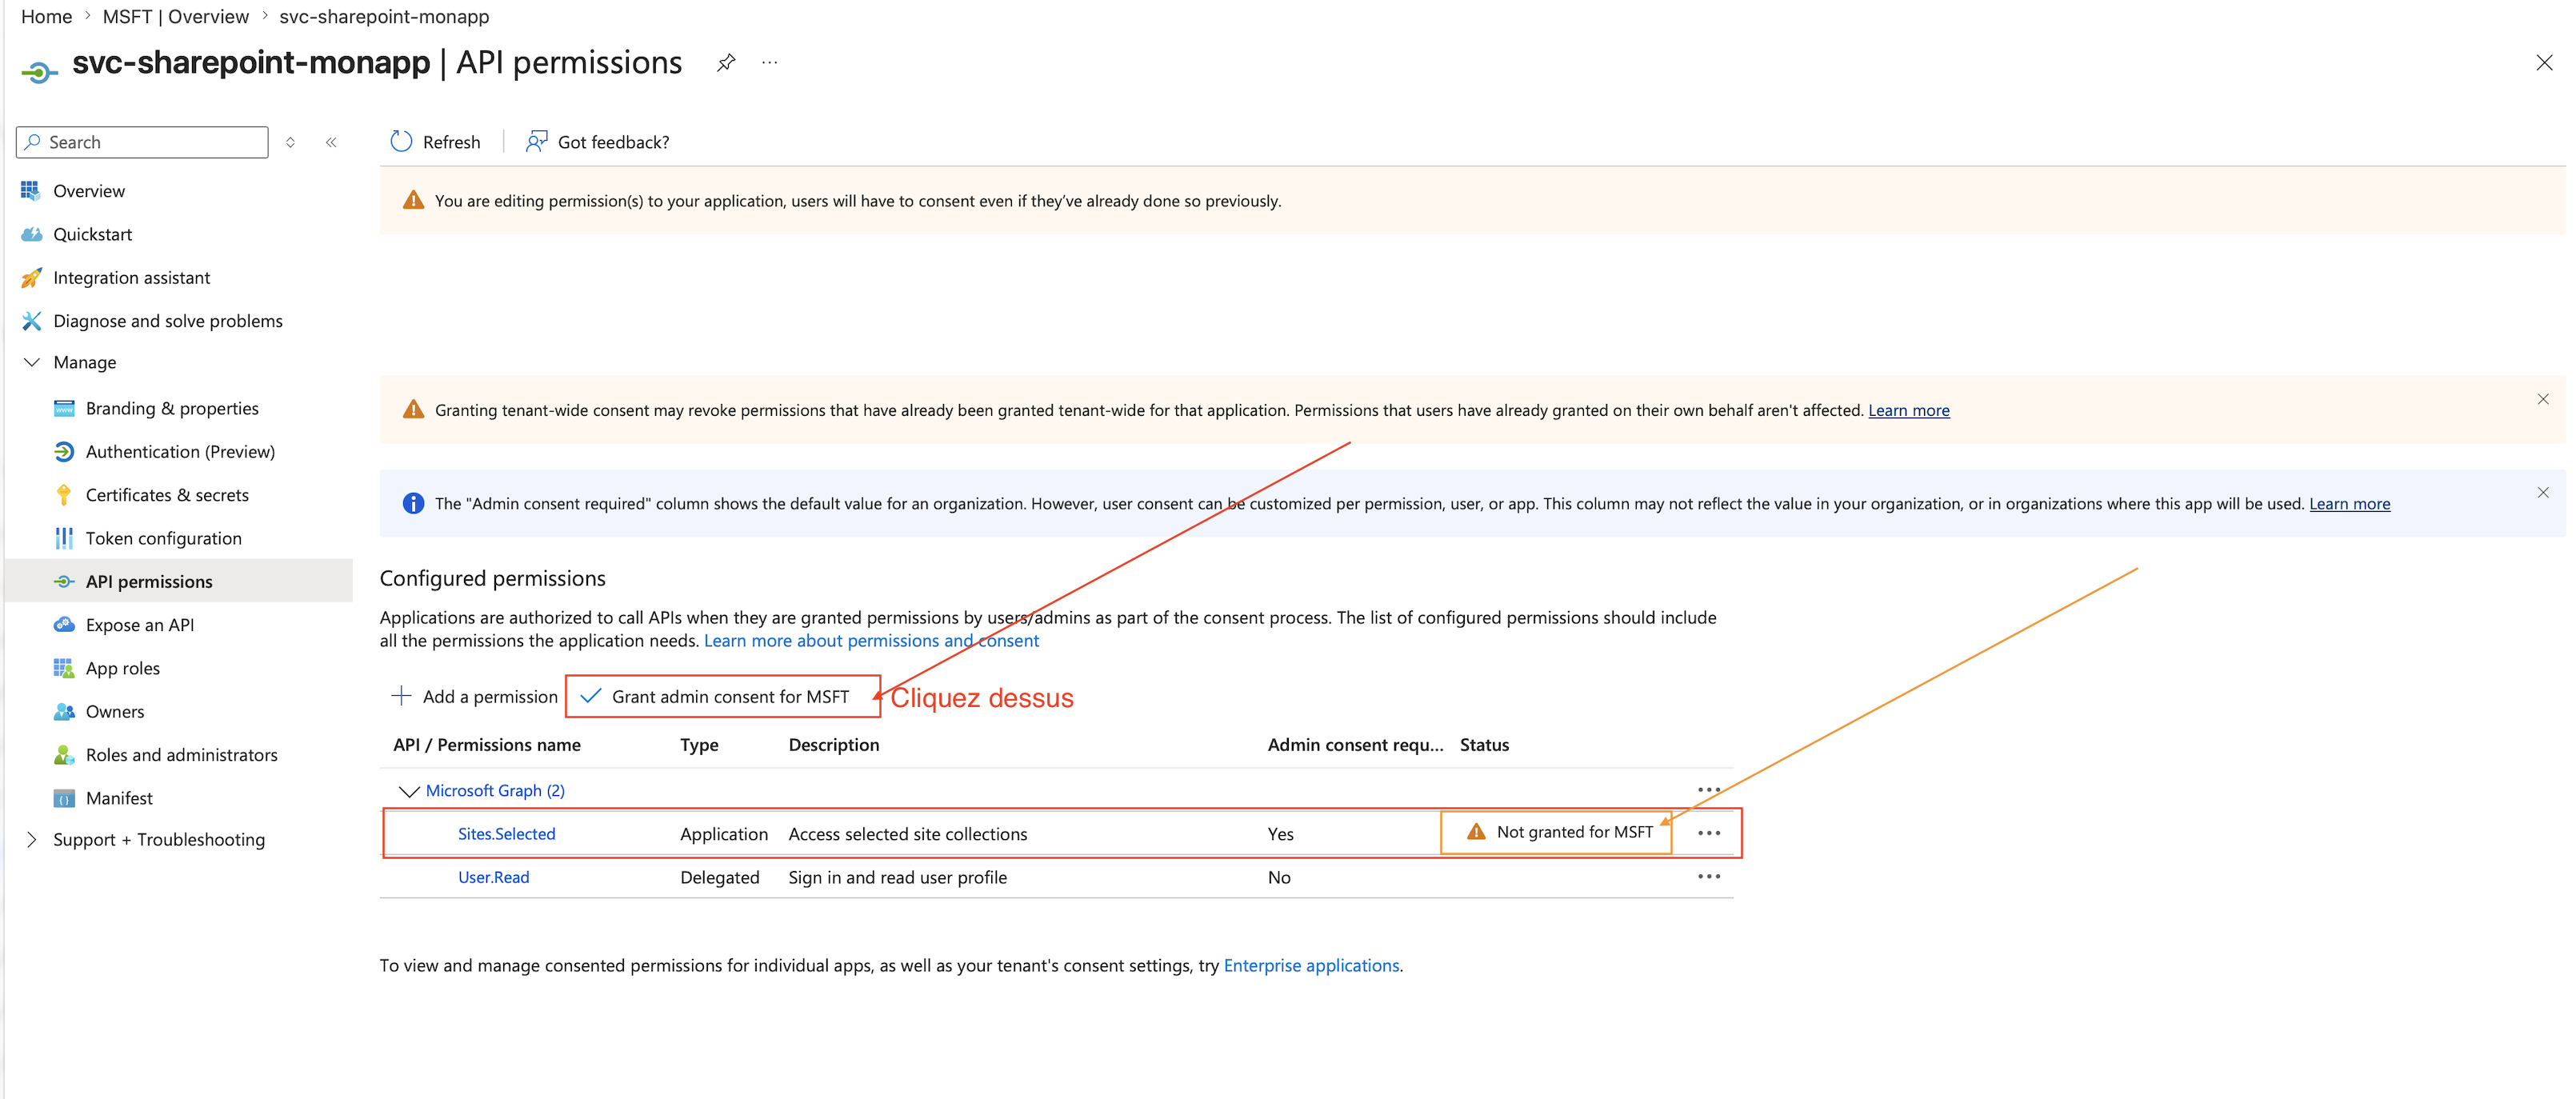
- Select Grant admin consent for [tenant].
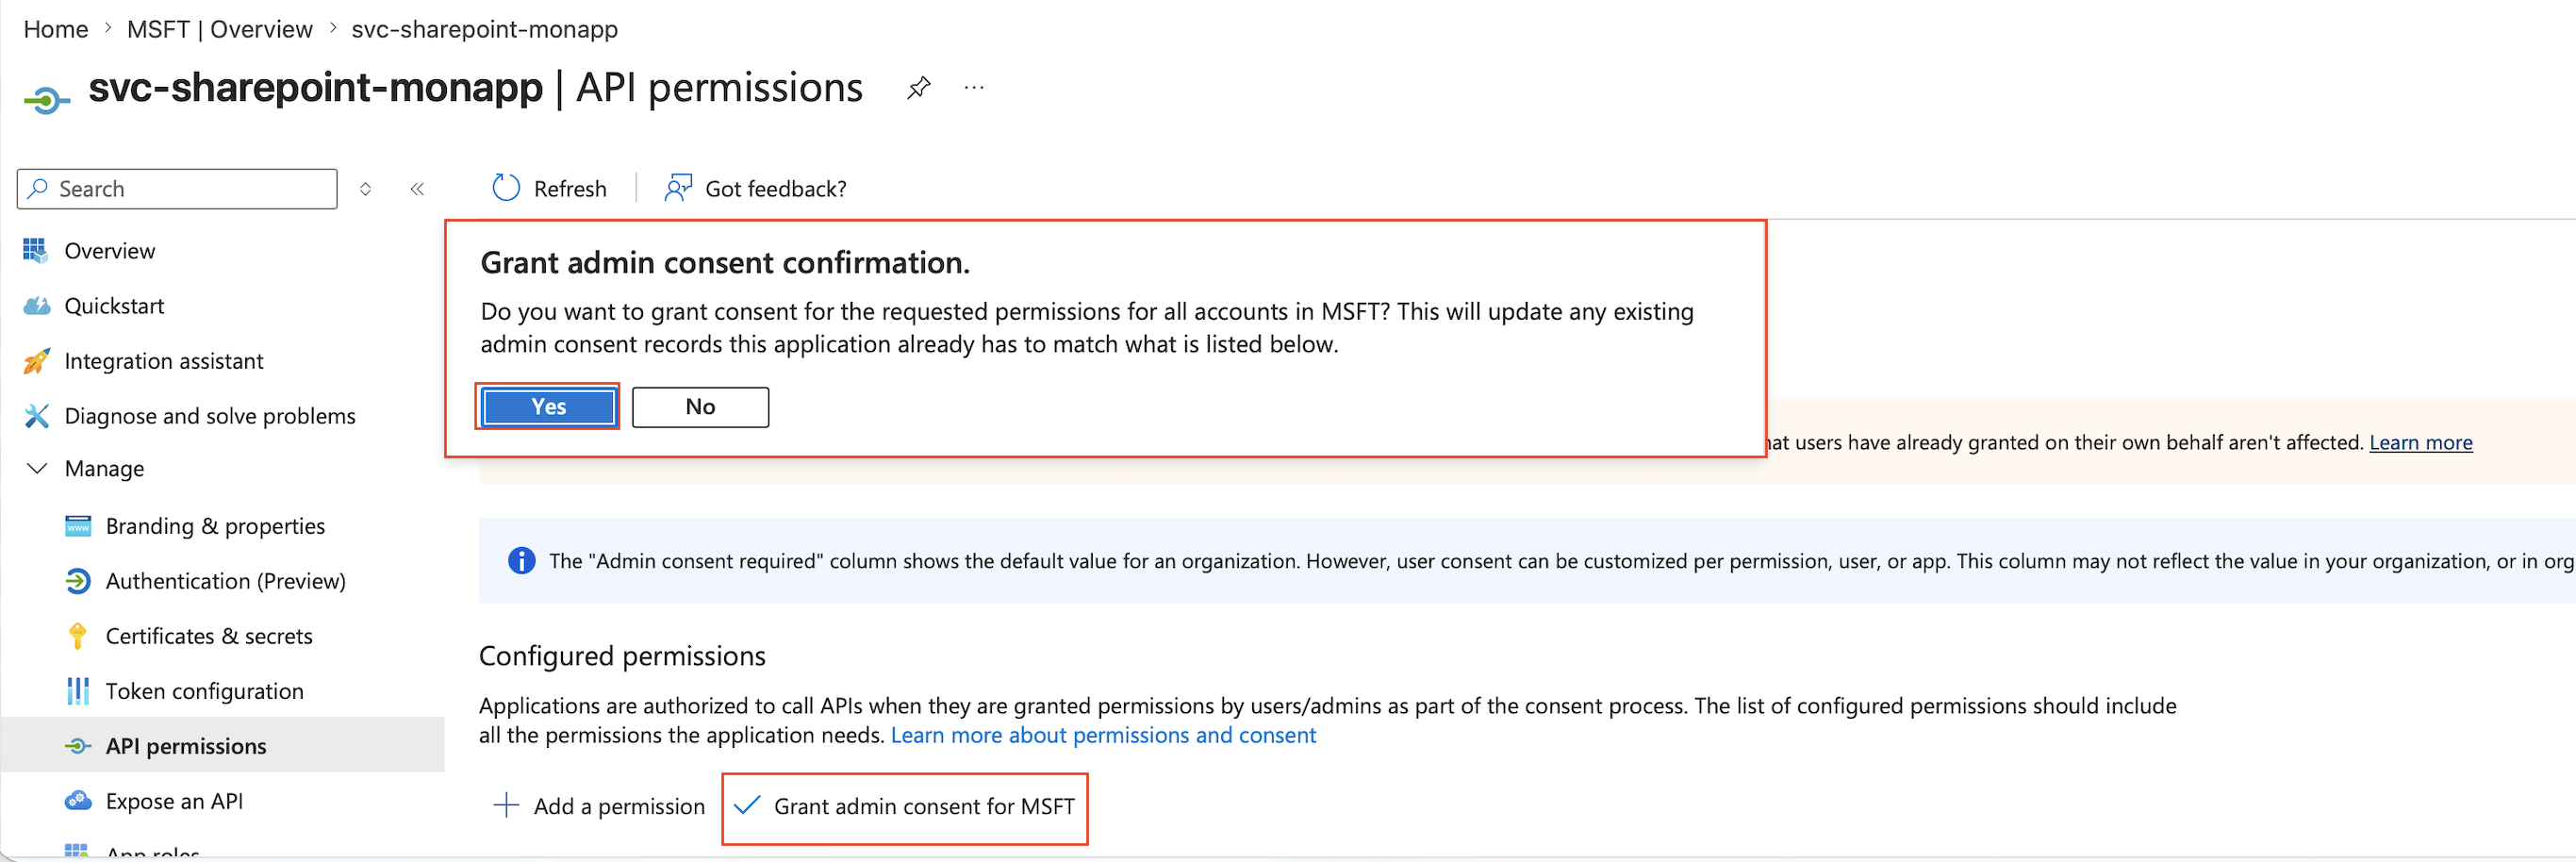
- Confirm the operation when prompted.
The Status column must display a green check mark and Granted for [tenant].
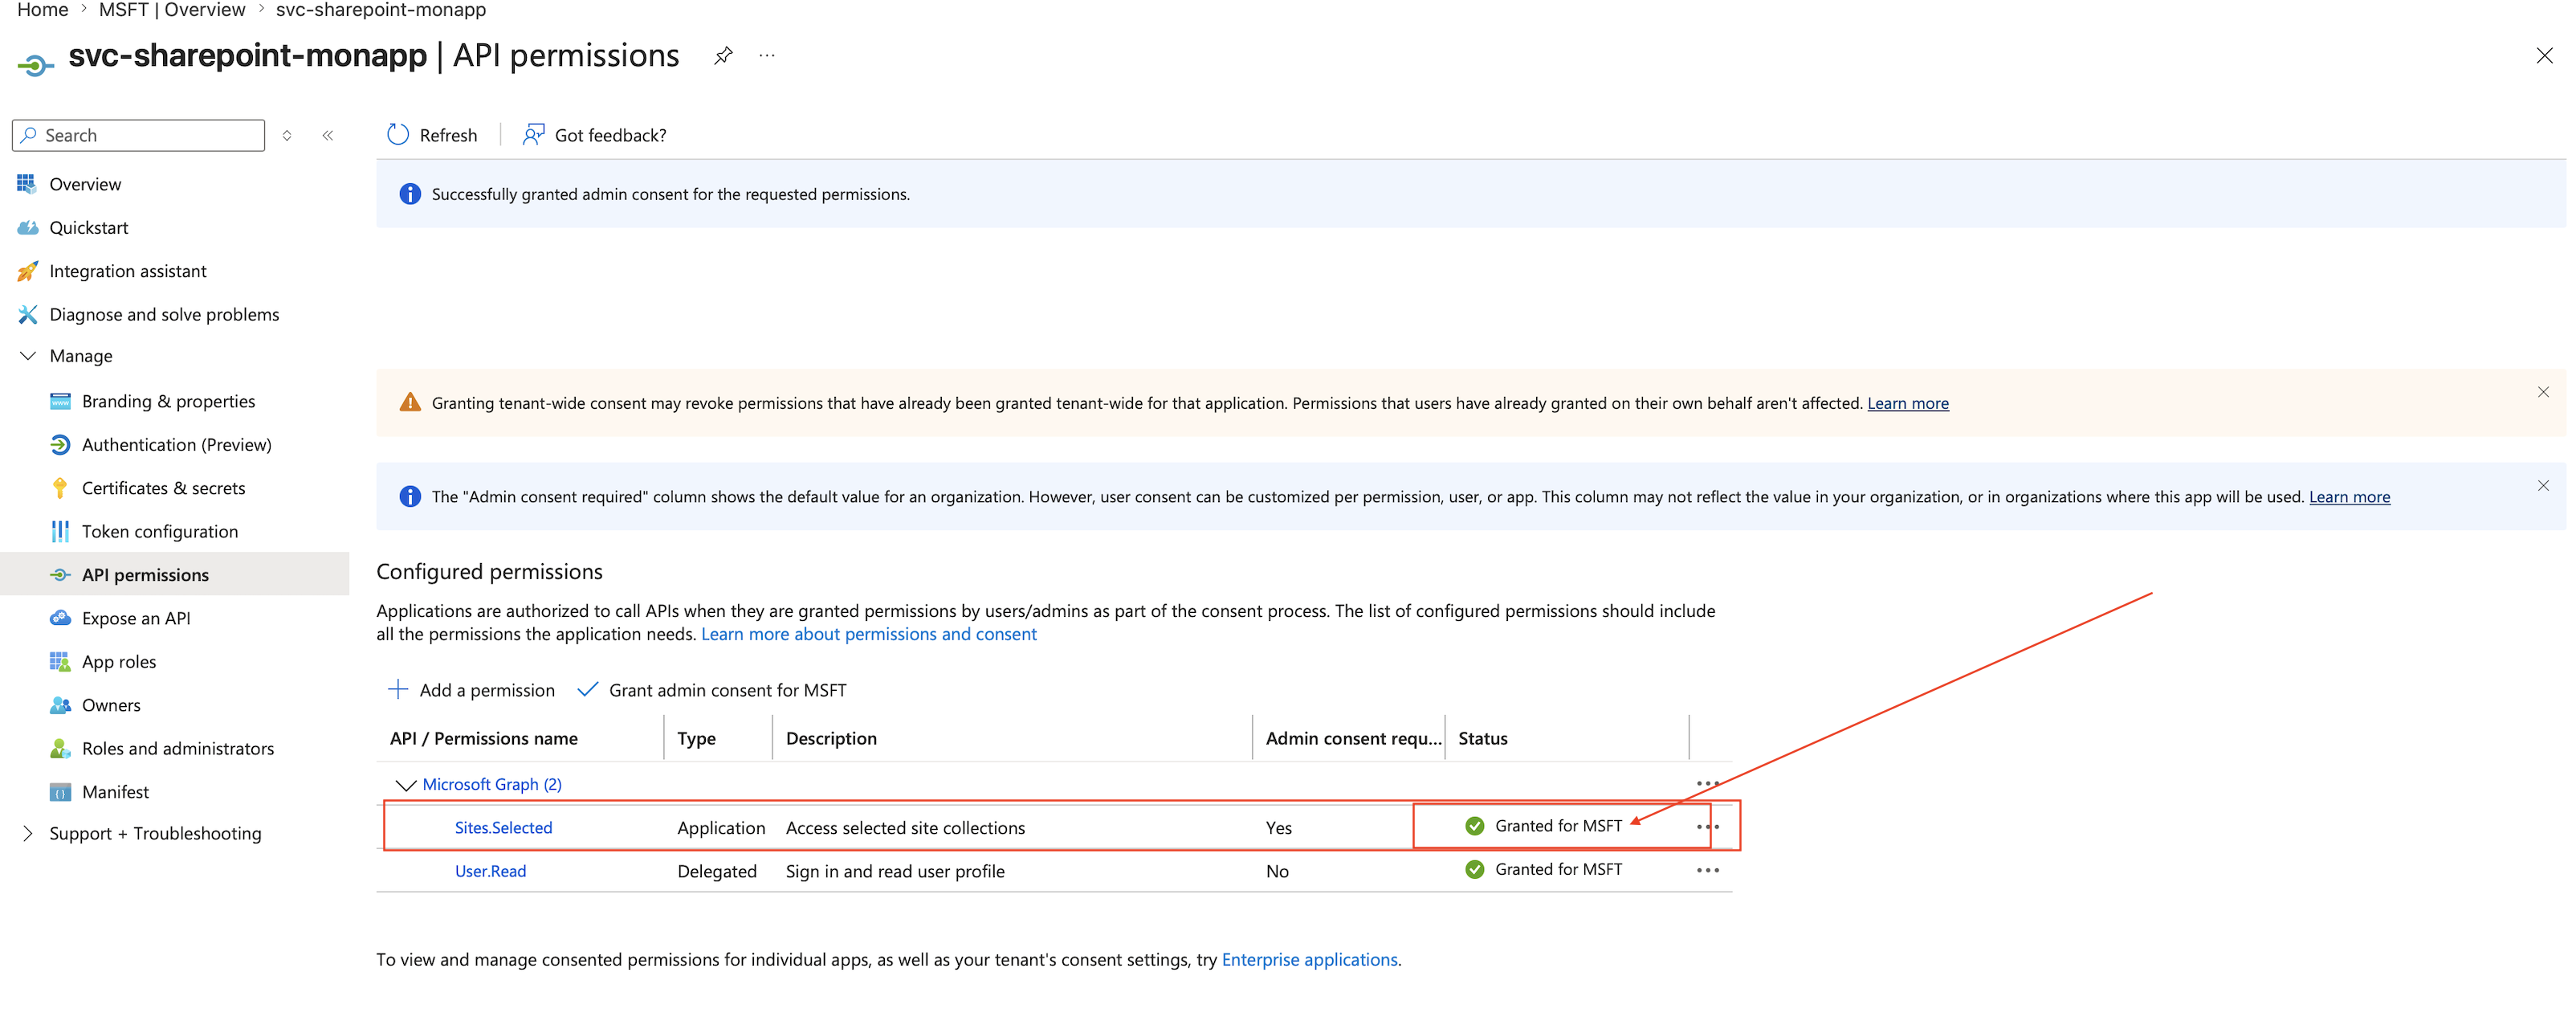
Without administrator consent, the permission is configured but remains inactive.
4. Create a client secret
The application needs a credential to authenticate. A certificate is preferable in production; this guide uses a client secret.
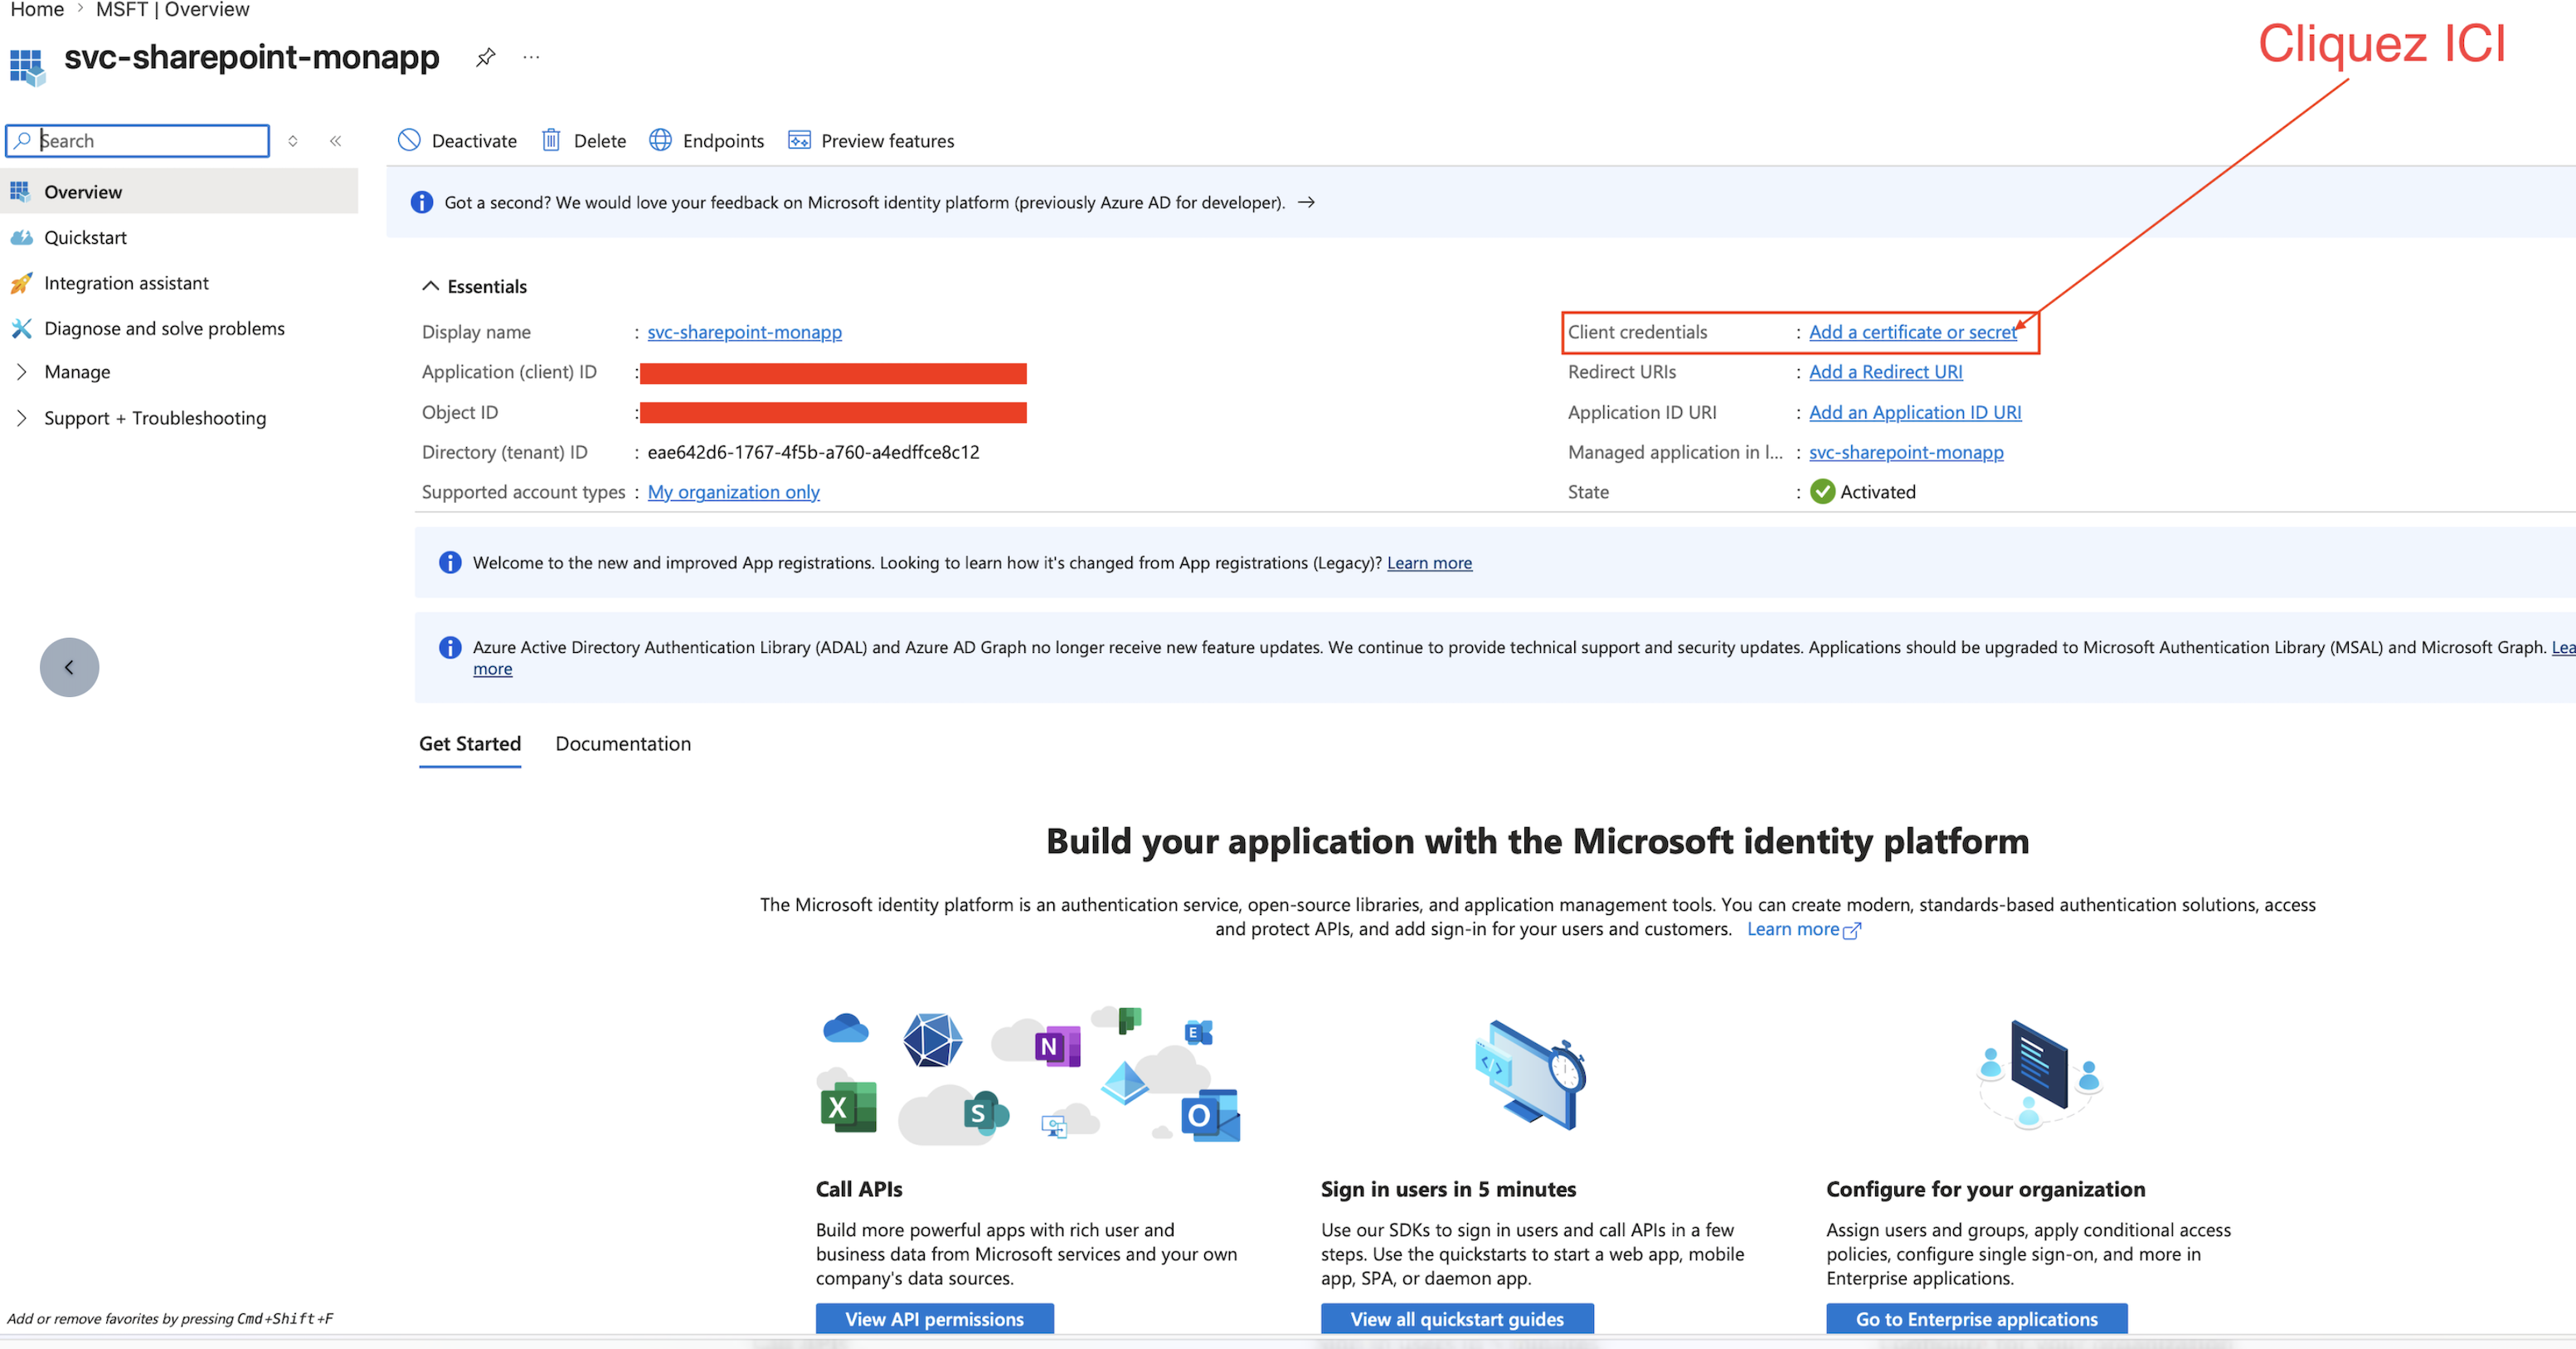
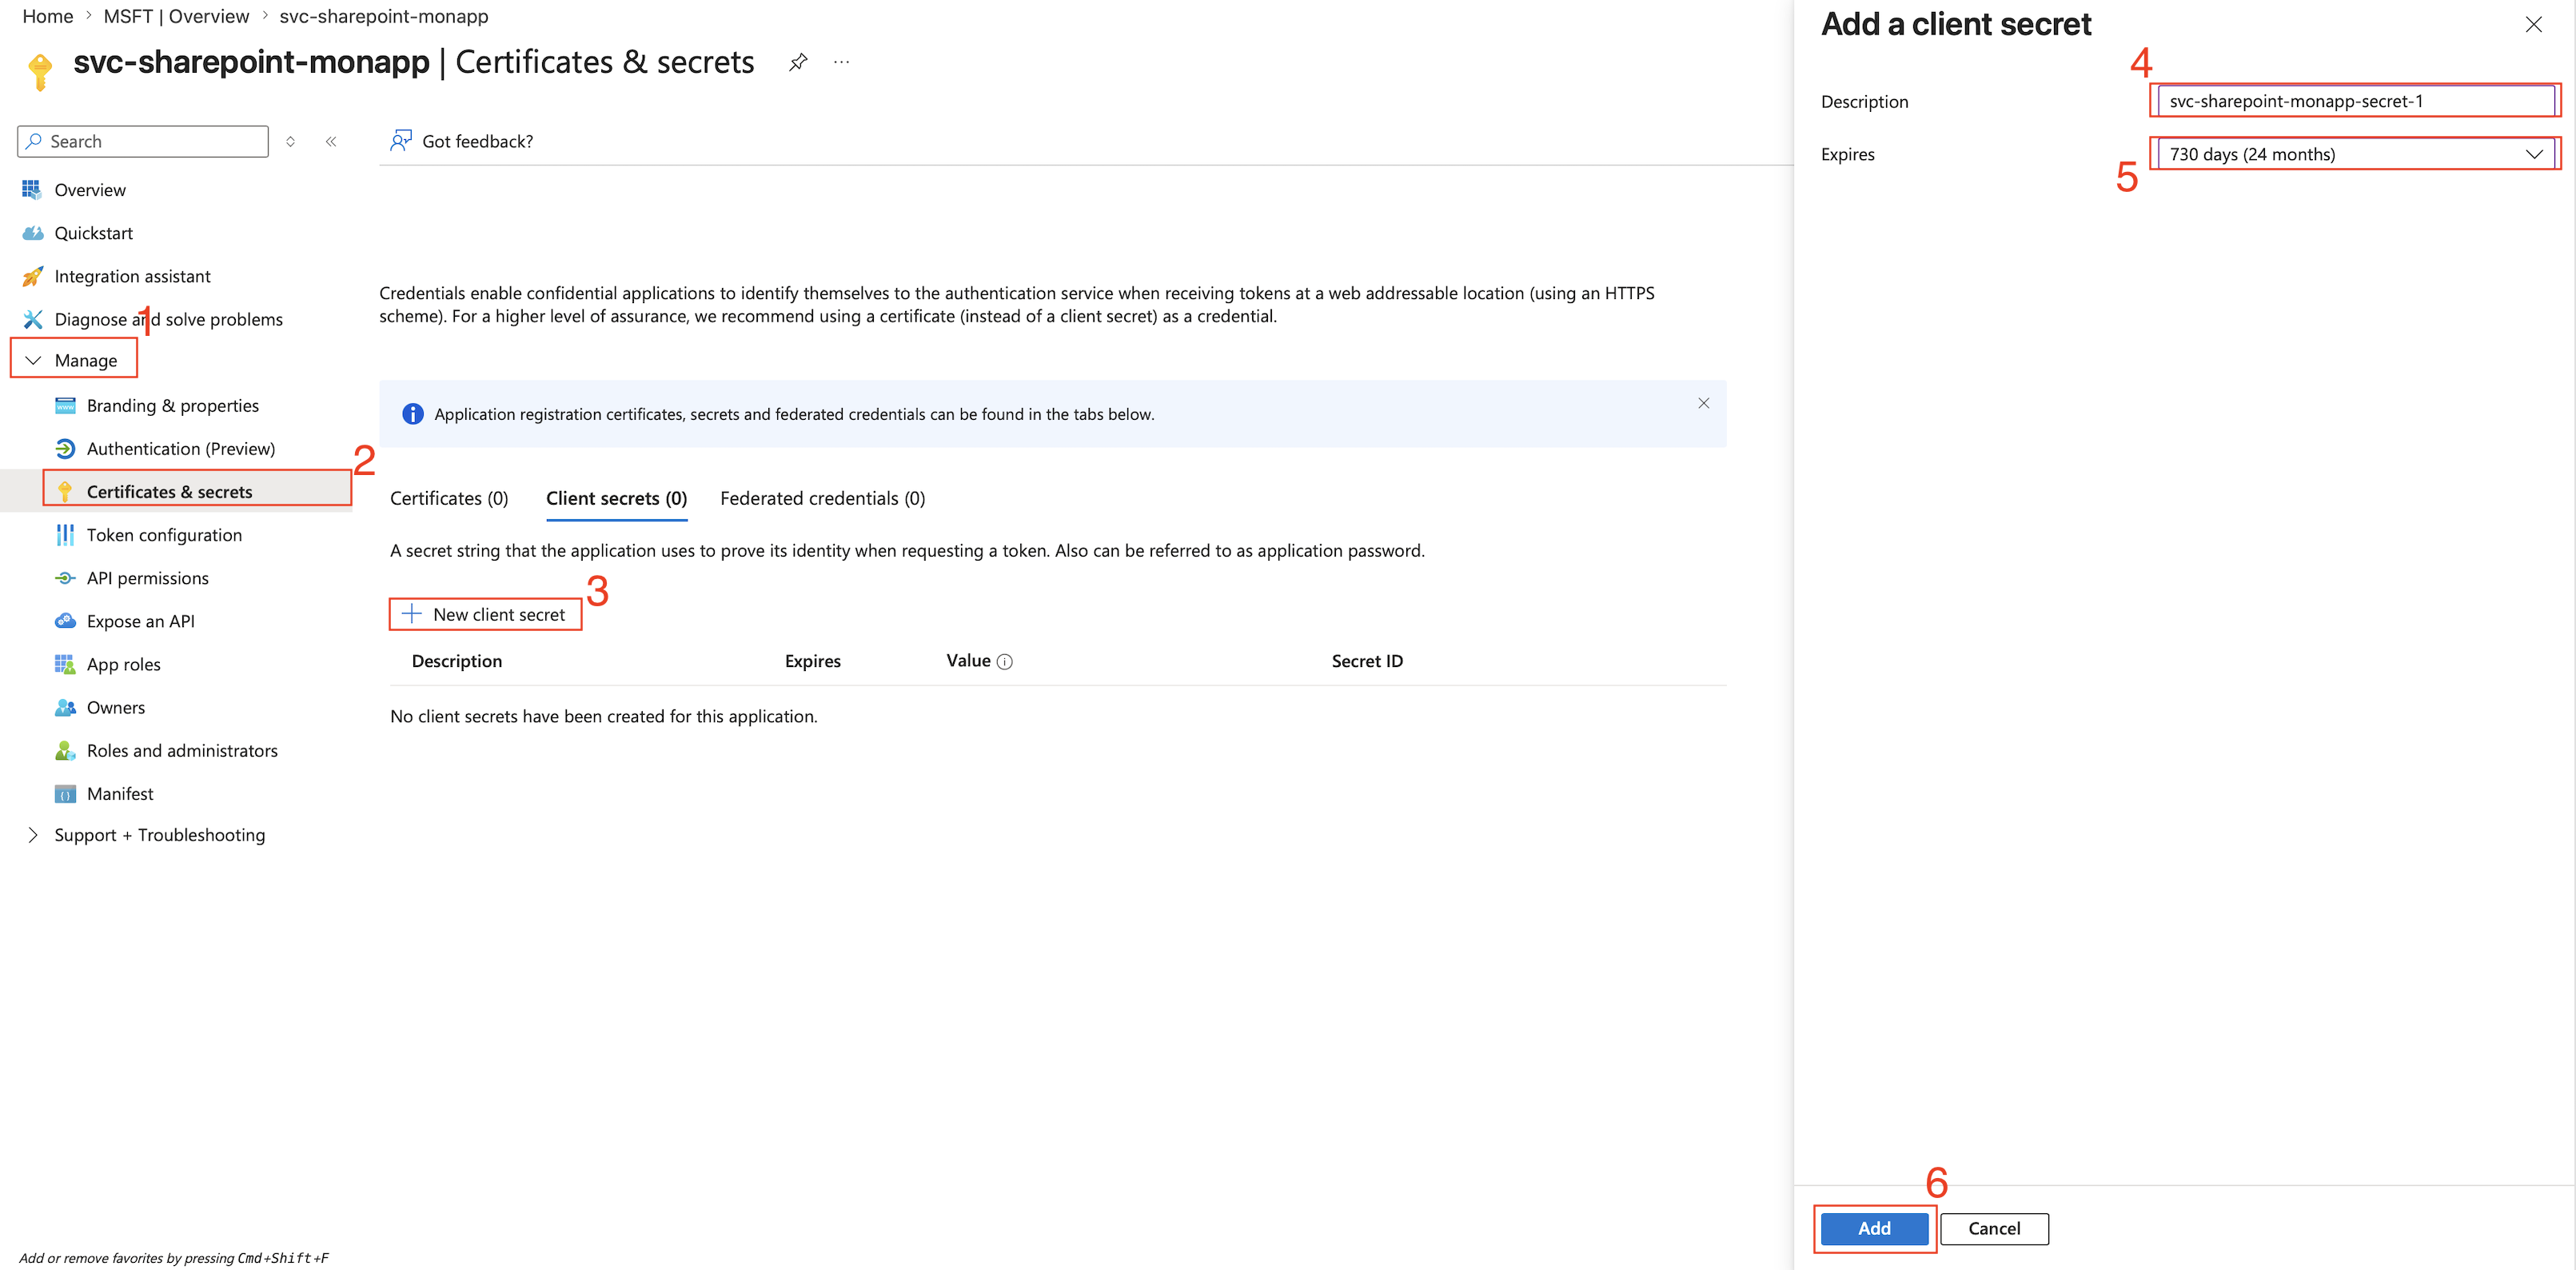
- From Overview, select Add a certificate or secret. You can also open Manage > Certificates & secrets.
- On the Client secrets tab, select New client secret.
- Enter a description, select an expiration period that complies with your security policy, then select Add.
- Immediately copy the value in the Value column, not the Secret ID.
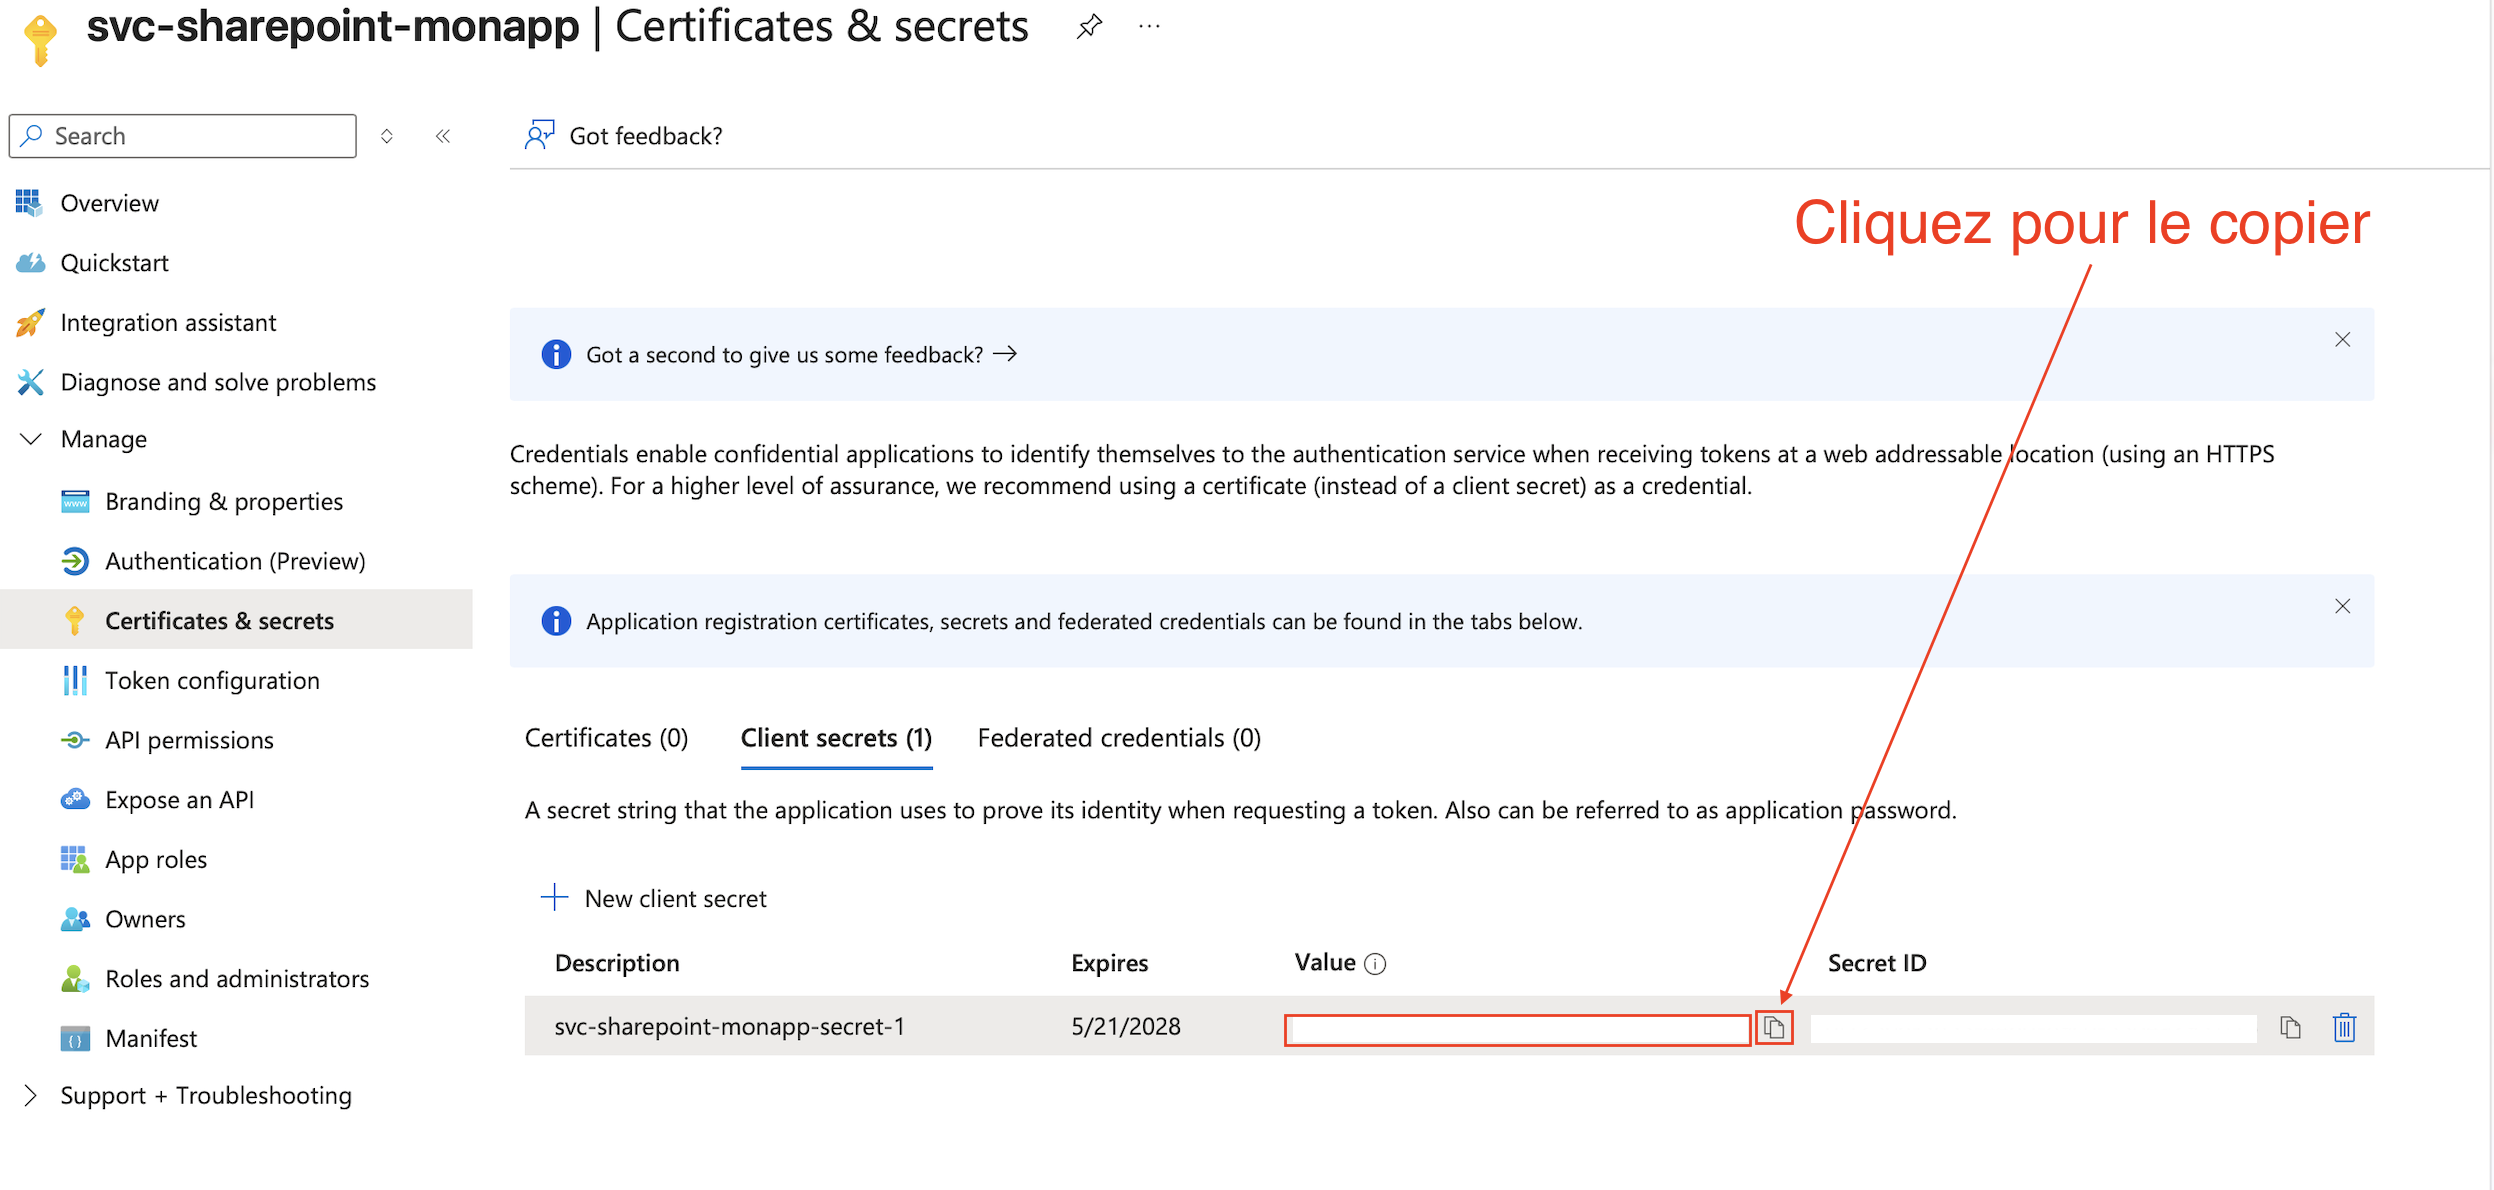
The secret value is no longer available after you leave this page. Store it in a secrets vault such as Azure Key Vault.
Authentication details
| Item | Description |
|---|---|
tenantId | Directory (tenant) ID |
clientId | Application (client) ID |
clientSecret | Client secret value |
5. Prepare the site assignment
The assignment must be performed by an identity with Sites.FullControl.All, such as a dedicated administration application.
Available site roles
| Role | Access |
|---|---|
read | Read-only access; this is the default used in this guide |
write | Read and write access |
manage | Write access and selected management operations |
fullcontrol | Full control, equivalent to a site owner |
6. Assign the site with Python
The process has three stages: obtain an access token, resolve the site-id, and assign the permission.
The identity calling POST /sites/{site-id}/permissions must have Sites.FullControl.All.
Two approaches are available:
- Dedicated administration application — recommended: a bootstrap application with
Sites.FullControl.Allgrants access to the target application that hasSites.Selected.ADMIN_CLIENT_IDandADMIN_CLIENT_SECRETare therefore different fromTARGET_CLIENT_ID. - Temporary self-assignment: temporarily grant
Sites.FullControl.Allto the target application, assign the site, then remove the tenant-wide permission. This temporarily weakens the least-privilege model.
This guide uses a dedicated administration application. Create a second App Registration, then add the Sites.FullControl.All application permission.
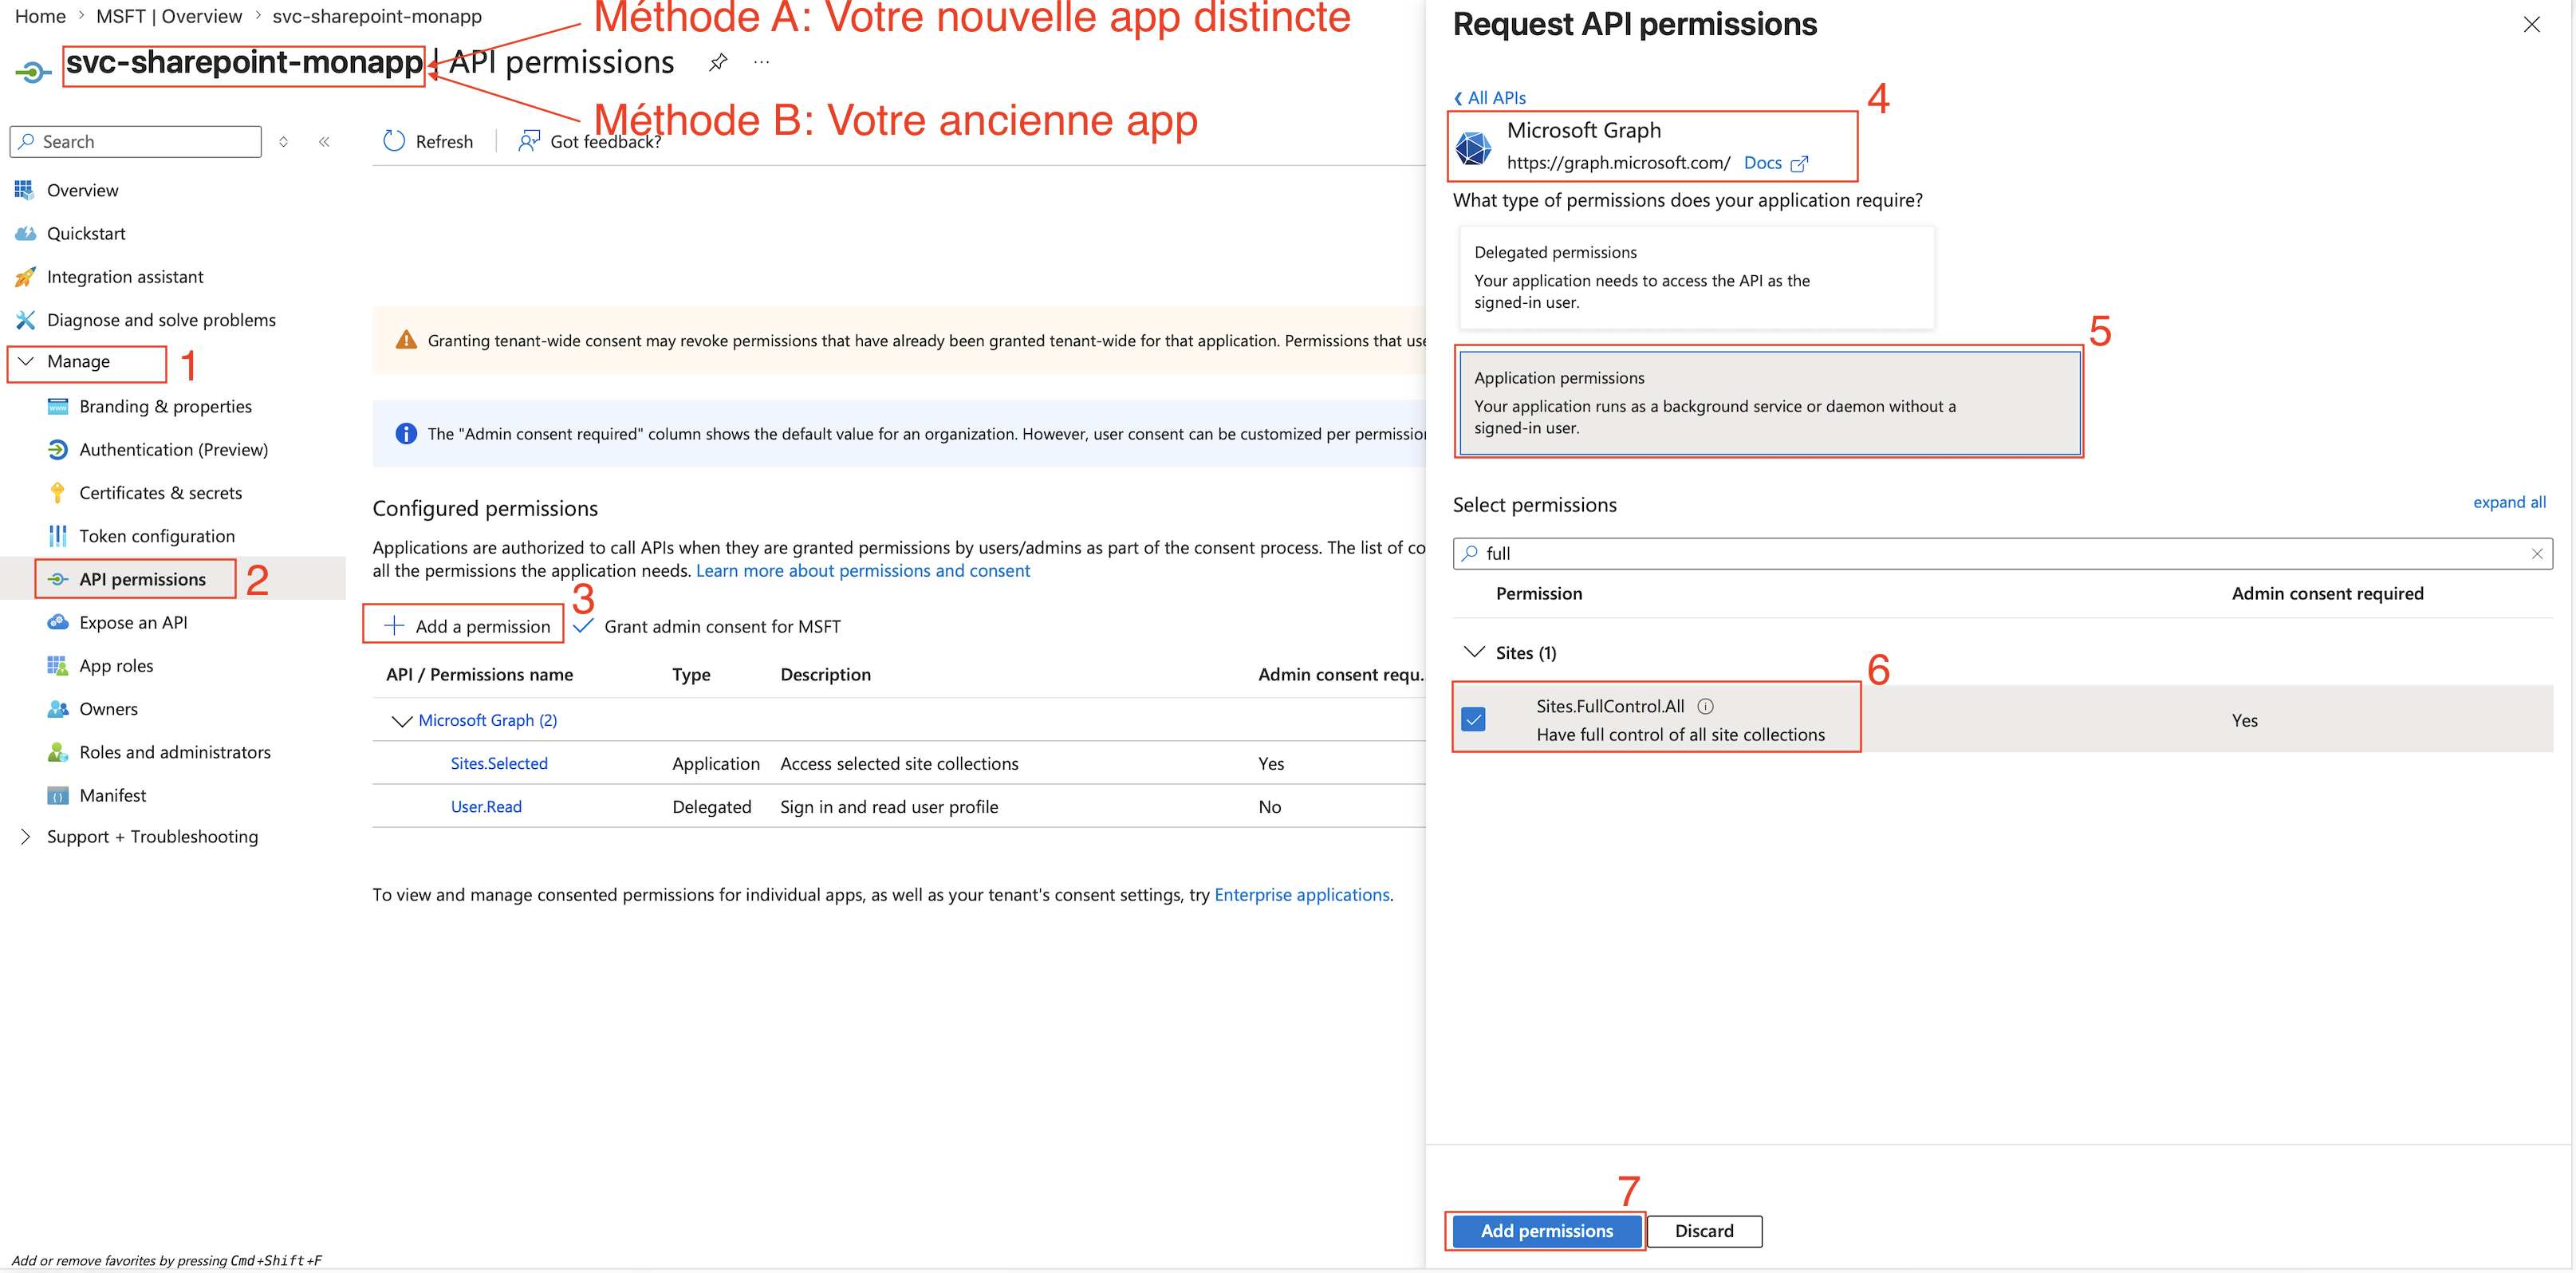
Grant administrator consent, create a client secret, and retrieve the administration application's Tenant ID, Client ID, and secret value.
Environment variables
Create a .env file:
TENANT_ID=xxxxxxxx-xxxx-xxxx-xxxx-xxxxxxxxxxxx
# Identity performing the grant; requires Sites.FullControl.All
ADMIN_CLIENT_ID=xxxxxxxx-xxxx-xxxx-xxxx-xxxxxxxxxxxx
ADMIN_CLIENT_SECRET=admin-application-secret
# Target application with Sites.Selected
TARGET_CLIENT_ID=xxxxxxxx-xxxx-xxxx-xxxx-xxxxxxxxxxxx
TARGET_APP_NAME=svc-sharepoint-myapp
SITE_URL=https://contoso.sharepoint.com/sites/Finance
GRANT_ROLES=read
Create requirements.txt:
requests
python-dotenv
Use the grant_sharepoint_permissions.py script from the main documentation project. It obtains a token through the client credentials flow, resolves the site with GET /sites/{hostname}:/{path}, and manages the target application permission through /sites/{site-id}/permissions.
Installation and commands
python3 -m venv .venv
source .venv/bin/activate
pip install -r requirements.txt

# List the target application's permissions
python grant_sharepoint_permissions.py list

# Grant the roles configured in GRANT_ROLES
python grant_sharepoint_permissions.py grant

# Revoke every permission belonging to TARGET_CLIENT_ID
python grant_sharepoint_permissions.py revoke

# Revoke one permission by ID
python grant_sharepoint_permissions.py revoke --permission-id <id>
Run list first to retrieve permission IDs before revoking a specific permission.
7. Troubleshooting
AADSTS7000215 — invalid client secret
The secret is incorrect or has expired. Make sure you copied the secret Value, not its Secret ID, and check for leading or trailing spaces.
403 Forbidden when accessing the site
The token is valid, but the target application does not have the required permission on that site. Run list, then assign the permission again with grant. Remember that Sites.Selected only provides access to explicitly assigned sites.
Authorization_RequestDenied during grant
The identity performing the assignment does not have Sites.FullControl.All. The administration application identified by ADMIN_CLIENT_ID needs this application permission with administrator consent, not the target application.
8. Information to retain
| Item | Source | Sensitive? |
|---|---|---|
| Tenant ID | Application Overview | No |
| Client ID | Application Overview | No |
| Client secret or certificate | Certificates & secrets | Yes — store it in a secrets vault |
| Site ID | Response from GET /sites/... | No |
| Permission ID | Response from POST /permissions | No, but useful for revocation |